
-
Modelers Alliance has updated the forum software on our website. We have migrated all post, content and user accounts but we could not migrate the passwords.
This requires that you manually reset your password.
Please click here, http://modelersalliance.org/forums/login to go to logon page and use the "Forgot your Password" option.
You are using an out of date browser. It may not display this or other websites correctly.
You should upgrade or use an alternative browser.
You should upgrade or use an alternative browser.
STARFIGHTERS!!!! a buildalong
- Thread starter SA Dave
- Start date


You go Rich! 


")
That's an awesome scheme.
RichB
Well-known member
Got some paint on the sub-assemblies.
The cockpit tub.


The instrument panel. Unfortunately, Italeri does not include any instrument faces, either as decals or raised surfaces. I have some Airscale Early Jet Instrument decals on order to rectify the deficiency. I added 4 emergency handles (2 yellow and 1 red at the top of the lower panel and the yellow on the lower right side) and the Landing Gear handle on the far left side.

The main landing gear. I didn't much extra detail to the bay as most of it will not be seen once the main doors are installed. The brake lines were added that run along the upper surface of the gear legs. Tie down rings were added, that unfortunately can't bee seen in the photos.


Construction will slow down while I wait for the instrument decals and can close up the fuselage. Until then, I'll be hopping around the instructions building/painting what sub-assemblies I can.
Cheers,
Rich
The cockpit tub.
The instrument panel. Unfortunately, Italeri does not include any instrument faces, either as decals or raised surfaces. I have some Airscale Early Jet Instrument decals on order to rectify the deficiency. I added 4 emergency handles (2 yellow and 1 red at the top of the lower panel and the yellow on the lower right side) and the Landing Gear handle on the far left side.
The main landing gear. I didn't much extra detail to the bay as most of it will not be seen once the main doors are installed. The brake lines were added that run along the upper surface of the gear legs. Tie down rings were added, that unfortunately can't bee seen in the photos.
Construction will slow down while I wait for the instrument decals and can close up the fuselage. Until then, I'll be hopping around the instructions building/painting what sub-assemblies I can.
Cheers,
Rich
JamesOLeary
Master at Arms
Your models are coming along nicely Rich and Dave.
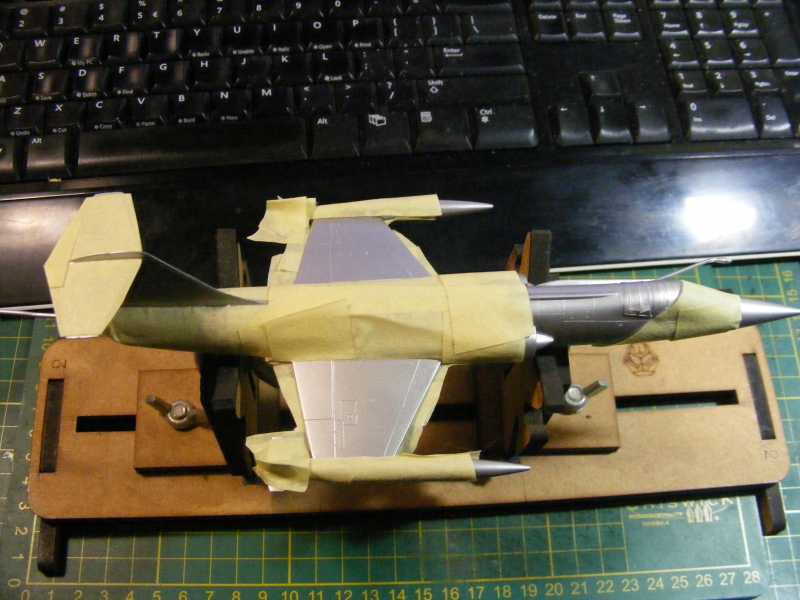
Dave, that is a pretty cool device you have for holding the plane. Is that something you came up with or is it something a company produces? I have put off doing any aircraft for years because I remember the one plane I built as a kid ended up having all kinds of finger prints and gaps in the joining of the fuselage. Then when I tried painting it, I held it by hand and that ended up messing up the model. The device you are using looks pretty handy.
Can't wait to see the finished models.
Cheers,
James
RichB
Well-known member
Thanks guys.
Pressing on with the seat. This is the Eduard Brassin resin seat. The holes along the guide rails were lightly flashed over and were opened up with a drill bit.The only PE added at this point are the foot rests. With the basic seat painted I can add the PE handles and seat belts.


Pressing on with the seat. This is the Eduard Brassin resin seat. The holes along the guide rails were lightly flashed over and were opened up with a drill bit.The only PE added at this point are the foot rests. With the basic seat painted I can add the PE handles and seat belts.
Woooo....
Love it!
Love it!
Sherman 18
Master at Arms
Looking good
RichB
Well-known member
Added the PE details and seat belts to the seat. Everything was pre-finished but the silk screening on the belts peeled off when you tried to bend them. So I ended up painting, washing and dry-brushing them once they were installed.


And the seat installed in its new home.


Cheers,
Rich
And the seat installed in its new home.
Cheers,
Rich
Heavens Eagle
Well-known member
That seat really looks good Rich!
I have always wondered if the printing on the seatbelts would peel or chip off with bending them. :hmmm While I have not had any problems so far with bending the printed parts (knock, knock, knock ) it has always been in the back of my mind when working with those parts. You just confirmed that there can indeed be an issue with the seat belts.
I have always wondered if the printing on the seatbelts would peel or chip off with bending them. :hmmm While I have not had any problems so far with bending the printed parts (knock, knock, knock
) it has always been in the back of my mind when working with those parts. You just confirmed that there can indeed be an issue with the seat belts.JamesOLeary
Master at Arms
Holy ejection seats, Batman! That looks awesome.
Cheers,
James
Cheers,
James