• Modelers Alliance has updated the forum software on our website. We have migrated all post, content and user accounts but we could not migrate the passwords.
    This requires that you manually reset your password.
    Please click here, http://modelersalliance.org/forums/login to go to logon page and use the "Forgot your Password" option.

A Tribute to my Grandad

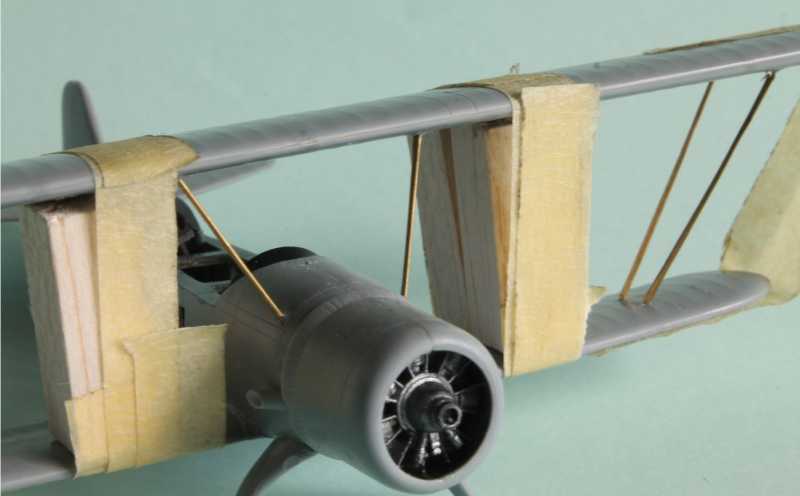
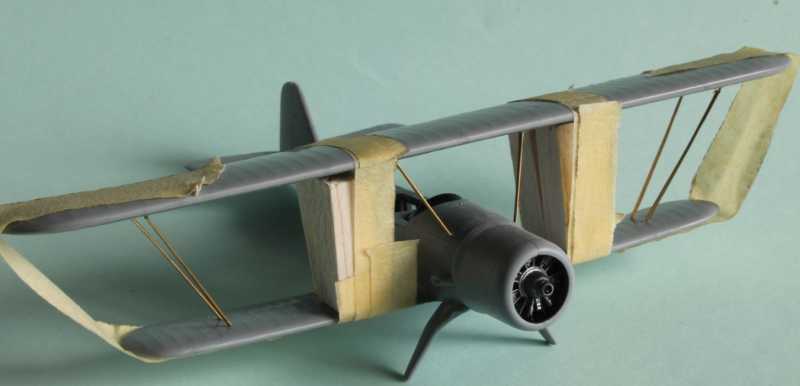
I'm interested in how you handle those flarings around the turnbuckles attached to the bottom of the top wing. My perpetually stalled P6 Hawk has those, they are there to cover the turnbuckles and aid in aerodynamics. :popcorn

I am handling them very well at the moment ...not thinking about them :D


I'll have to think of something soon though, keep you upted, I think I'm going to try a couple of things ...


Laurence
 
Thank you Gentlemen :notworthy :notworthy :notworthy

More work done, most struts are up. Original ones too flimsy pieces of plastic. I made these ones from brass tube 0.8mm with a steel wire insert 0.15mm, 0.5mm sticking out at each end.

Flatten the brass tube to make it look more realistic, then drilled holes in the wings, where the sticking out wires will be inserted and glued in with CA.


h2975f9c.JPG


h218a715.JPG


3 more struts to add, then off to rigging .....fun.


Very interested in comments and critique.

Thanks for watching,

Laurence
 
My first impression is it looks too tall but looking back at the original photos it looks tall there also. I know you wouldn't have made a mistake like that Laurence. (y)

Great job overcoming a trouble spot! :popcorn
 
I have thought about doing that before but still have not tried it .

Wish I could see it in person to better evaluate it .

Brave for trying .

Cheers, Christian B)
 
My first impression is it looks too tall but looking back at the original photos it looks tall there also. I know you wouldn't have made a mistake like that Laurence. (y)

Great job overcoming a trouble spot! :popcorn

Thanks Bob.

I measured it ten times, have a few photos that I used to make sure I get it as closely to the real thing as possible.

:D
 
How did you flatten the tubing? Looks very good as struts. (y)


Thanks Mike,

Used jewellery pliers, flat jaws, made three or four passes, squeezing harder with every pass. As I found out, if I squeezed too strongly from the first pass, the tube cracks / misaligned, looking twisted.

Laurence
 
I have thought about doing that before but still have not tried it .

Wish I could see it in person to better evaluate it .

Brave for trying .

Cheers, Christian B)

Thanks Christian,

The tricky bit is about fitting the struts in place. With the steel wire sticking out at each end, I had to pull the wings apart a bit for the strut to fit without scratching the plastic. I did get some scratches before I figured it out though but nothing major.
I will use Mr. Surfacer to fill in the gaps / holes in the wings as they were a fraction of a mm larger than the wire.


Laurence
 
Great job,Laurence... I known it is not easy...but,for sure,you will make an excelent work :good: ... Following with full attention :popcorn

Best regards!

Luiz
 
How did you flatten the tubing? Looks very good as struts. (y)


Thanks Mike,

Used jewellery pliers, flat jaws, made three or four passes, squeezing harder with every pass. As I found out, if I squeezed too strongly from the first pass, the tube cracks / misaligned, looking twisted.

Laurence

We were discussing this at lunch today Laurence, shame you weren't there. Were you using the pivot end of the pliers for the tapered end of the strut?
 
Thank you Luiz, hope it all works out :notworthy

MP - I applied a bit more pressure at each end with the top end of the jaws. I tried as close to the pivot, but that left an indentation. Maybe it would work the way you suggested too, but that is what worked for me.

Cheers,

Laurence
 
Very cool looking Lawrence. As for the rigging shrouds, I think I would use lead sheet. Cut a small rectangle and bend it in half and then slip over and crimp the back with flat duck billed pliers. Alternately maybe white glue reinforced tissue.
Love the cabanes.
James
 
That is MODELLING! (y) :ro: I should think your brass struts would have quite a lot more strength than the plastic strut replacement stock does. Have you considered bitty pieces of tamiya tape for the turnbuckle gloves? :pilot
 
Very cool looking Lawrence. As for the rigging shrouds, I think I would use lead sheet. Cut a small rectangle and bend it in half and then slip over and crimp the back with flat duck billed pliers. Alternately maybe white glue reinforced tissue.
Love the cabanes.
James

:hmmm :hmmm
 
Very cool looking Lawrence. As for the rigging shrouds, I think I would use lead sheet. Cut a small rectangle and bend it in half and then slip over and crimp the back with flat duck billed pliers. Alternately maybe white glue reinforced tissue.
Love the cabanes.
James

That's a great suggestion James, I have some lead foil from uncle Verlinden's factory. It's definitely worth thinking about it. :notworthy

Laurence
 
That is MODELLING! (y) :ro: I should think your brass struts would have quite a lot more strength than the plastic strut replacement stock does. Have you considered bitty pieces of tamiya tape for the turnbuckle gloves? :pilot


Thank you Sir :notworthy

The brass struts are WAY stronger than the pieces of plastic, and nope, I haven't thought of using that, but worth considering :D


Laurence
 
Back
Top