
-
Modelers Alliance has updated the forum software on our website. We have migrated all post, content and user accounts but we could not migrate the passwords.
This requires that you manually reset your password.
Please click here, http://modelersalliance.org/forums/login to go to logon page and use the "Forgot your Password" option.
You are using an out of date browser. It may not display this or other websites correctly.
You should upgrade or use an alternative browser.
You should upgrade or use an alternative browser.
A pair of Academy P-38's for Tom
- Thread starter moon puppy
- Start date

And I just got stopped.
The freakin' windscreen does not fit the combing thing. The Aires kit has replacement part for the kit part, but it's made for the G/H model, even though the packaging says J model. The windscreen I have is for the J model. They are different.
This sucks all the mojo out of the room.
The freakin' windscreen does not fit the combing thing. The Aires kit has replacement part for the kit part, but it's made for the G/H model, even though the packaging says J model. The windscreen I have is for the J model. They are different.
This sucks all the mojo out of the room.
phantom II
Master at Arms
Well that bites Bob....I was just about to say you had this one on the run 
Cheers, Christian B)
Cheers, Christian B)
And I just got stopped.
The freakin' windscreen does not fit the combing thing. The Aires kit has replacement part for the kit part, but it's made for the G/H model, even though the packaging says J model. The windscreen I have is for the J model. They are different.
This sucks all the mojo out of the room.
Dat'll teach ya!!
Panic ye not... I have a spare !!
Ian.
I got a spare also, neither one fits the Aires part. I'll take pictures later. If your part cost more than 8 bucks to ship don't do it, I can get it from Squadron for that.
ij001
Well-known member
Got two-and-a-half hours at the bench this afternoon, so finished-off wiring the radios, and detail painting all of the 'pit. Dry-fitted everything together and whilst definitely not perfect, it's all do-able with the appropriate amounts of PSR, coffee and cursing.
Got the Print-Scale decals in the post on Thursday, which makes a total of eleven different machines I could finish it as... Guess what... still undecided...
Pics hopefully on Monday. AFN
Ian.
Got the Print-Scale decals in the post on Thursday, which makes a total of eleven different machines I could finish it as... Guess what... still undecided...
Pics hopefully on Monday. AFN
Ian.
Ian I wish you luck with yours, I'm shelving mine till I find the right canopy for this Aires cockpit combing area.
ij001
Well-known member
Well my kit seems to be giving me a lot less hassle than Bob's.
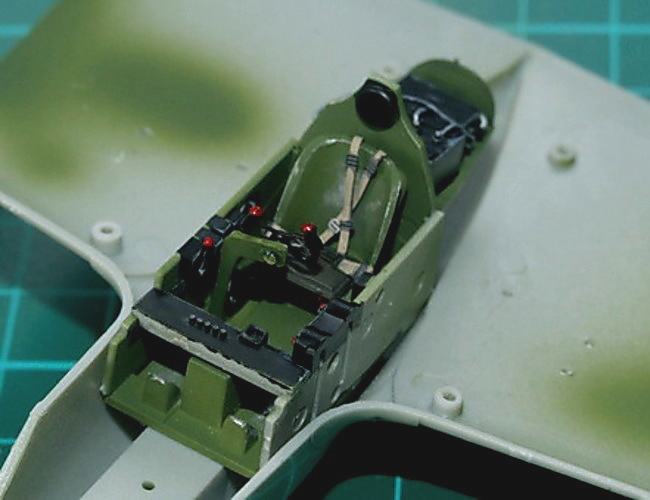
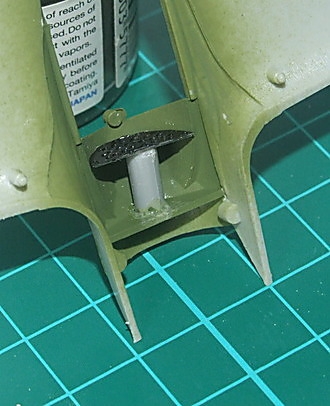
First thing I did, but didn't bother to photograph, was to build the main gear bays and then glue them in to the booms. Next I set-about the 'pit. As you can see the radio has been wired and you probably cannot see that there's a few items of Eduard etch in there aswell. The instructions would have you mount the (Eduard) IP all the way down in the pod by that firewall you can see, I pushed it forward using an old Sparrow missile body as a spacer.

So here it is clamped together, with the booms just pushed in to place to check for fit 'issues'.
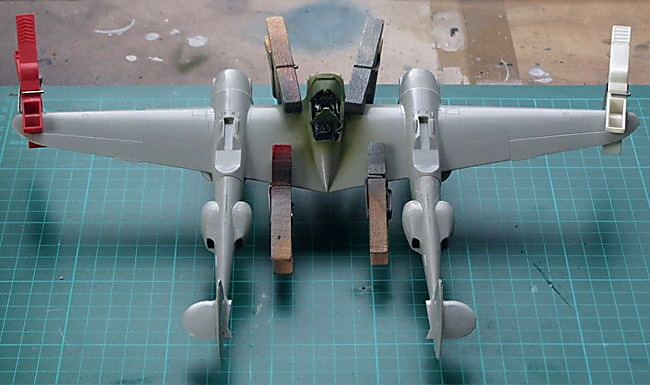
Which brings me to where I'm up to right this minute. A wee bit of filler at each root already rubbed-back and ready for final construction which may happen tomorrow - work & housework permitting. Somewhat surprisingly this is the only filler nedded so far.


Stay tuned, more soon.
Ian.
First thing I did, but didn't bother to photograph, was to build the main gear bays and then glue them in to the booms. Next I set-about the 'pit. As you can see the radio has been wired and you probably cannot see that there's a few items of Eduard etch in there aswell. The instructions would have you mount the (Eduard) IP all the way down in the pod by that firewall you can see, I pushed it forward using an old Sparrow missile body as a spacer.
So here it is clamped together, with the booms just pushed in to place to check for fit 'issues'.
Which brings me to where I'm up to right this minute. A wee bit of filler at each root already rubbed-back and ready for final construction which may happen tomorrow - work & housework permitting. Somewhat surprisingly this is the only filler nedded so far.
Stay tuned, more soon.
Ian.
Skinny_Mike
Well-known member
Great looking builds gents!
Bob, sorry you lost your Mojo on this one. It really was a fine looking build. Do you happen to have photos of the offending parts? I have he same kit with the same aires pit.... Thanks buddy!
Bob, sorry you lost your Mojo on this one. It really was a fine looking build. Do you happen to have photos of the offending parts? I have he same kit with the same aires pit.... Thanks buddy!
Great looking builds gents!
Bob, sorry you lost your Mojo on this one. It really was a fine looking build. Do you happen to have photos of the offending parts? I have he same kit with the same aires pit.... Thanks buddy!
Yeah Bob!! Pics! We want PICS!!!!!

Great looking builds gents!
Bob, sorry you lost your Mojo on this one. It really was a fine looking build. Do you happen to have photos of the offending parts? I have he same kit with the same aires pit.... Thanks buddy!
Make sure you get the right windscreen for it. I'll see if I can get some pictures. I tried to alter the kit windscreen to fit the aires stuff but it just didn't work out.
Looking good Ian.
Like have the seam at the wing root or somewhere logical.
phantom II
Master at Arms
I would like to point out that some of what you think is a seem ( wing root to fuselage panel ) is actually a weld bead .
Maybe that'll make things easier on you.
Cheers, Christian B)
Maybe that'll make things easier on you.
Cheers, Christian B)
I would like to point out that some of what you think is a seem ( wing root to fuselage panel ) is actually a weld bead .
Maybe that'll make things easier on you.
Cheers, Christian B)
:huh:
hmy: Shirley you Jest!!
phantom II
Master at Arms
I would like to point out that some of what you think is a seem ( wing root to fuselage panel ) is actually a weld bead .
Maybe that'll make things easier on you.
Cheers, Christian B)
:huh:
Shirley you Jest!!
Don't call me Shirley ! and no I don't jest .
