Jeff you're doing great. Really neat wood effects you got going one. which technique you like best?

-
Modelers Alliance has updated the forum software on our website. We have migrated all post, content and user accounts but we could not migrate the passwords.
This requires that you manually reset your password.
Please click here, http://modelersalliance.org/forums/login to go to logon page and use the "Forgot your Password" option.
You are using an out of date browser. It may not display this or other websites correctly.
You should upgrade or use an alternative browser.
You should upgrade or use an alternative browser.
WnW Albatross D.Va (OAW).
- Thread starter ausf
- Start date
Brokeneagle
Master at Arms

Looks great so far!
ausf
Master at Arms
Thanks again guys.
Bob, I looked at bunch of techniques on the interwebs and tried versions of most but I think what I'm going to use is my take on the handpainted wood grain. But instead of painting, I'm going to use Prismacolor pencils. I have more control that way versus the oil technique and the pencils really grip well on a flat base color. With a transparent color coat everything gets sealed. at least that's what I'm going to try. It works well for metal effects on track links, etc, why not wood grain.
On the interior I used Vallejo's natural wood and trans wood grain with an orange trans on top. I want it a lot lighter on the exterior, so we'll see. I've got the big box of 120 pencils to choose from. :hmmm
That's what I did on the prop for the Eindecker, haven't seen it use on larger areas so this should be interesting.
ausf
Master at Arms
You've got me interested in this pencil technique...anxiously awaiting more...
Me too Mike.

I'll take in progress shots.
I played around with decals last night. WnW specifically warns against using setting solutions with the lozenge sheets, but I wasn't having a good time using water. I started using MicroSol and it was getting better, but still not laying down that nicely. They recommend using heat but I'm scared of warping the wing, so I figured why not try some MicroSet.
I did the underside as a test, left it overnight and this morning was happy to find the decal sitting perfect, snug as a bug. :yipee
It went from the hideous wrinkling that MicroSet causes to a fantastic, painted on look. It's so tight, a piece of scrap that drapped over the top is is stuck so well, I can't remove it. I tried lifting, scraping, etc, even soaking with Sol, but it's stuck good. No big deal just looks like a patch and I'm not going to risk damaging the surface.
They're Cartograph decals, I wonder why they're against solutions?
I'm really enjoying this build. Is this what modeling is like? Just working on something and having fun? Strange. :hmmm
ausf
Master at Arms
Thanks Luiz.
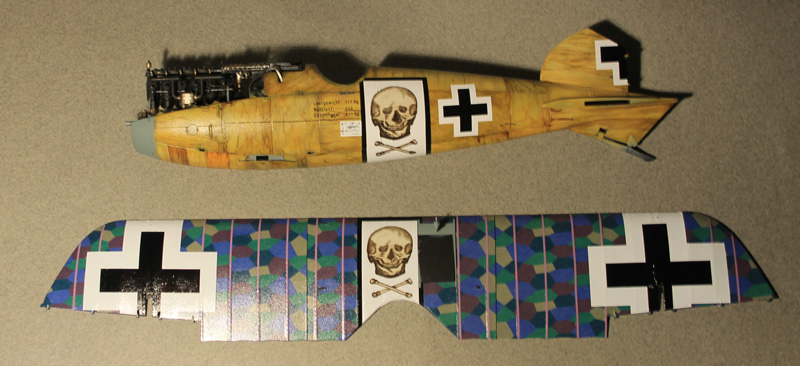
Okay, I'm on to the wood.
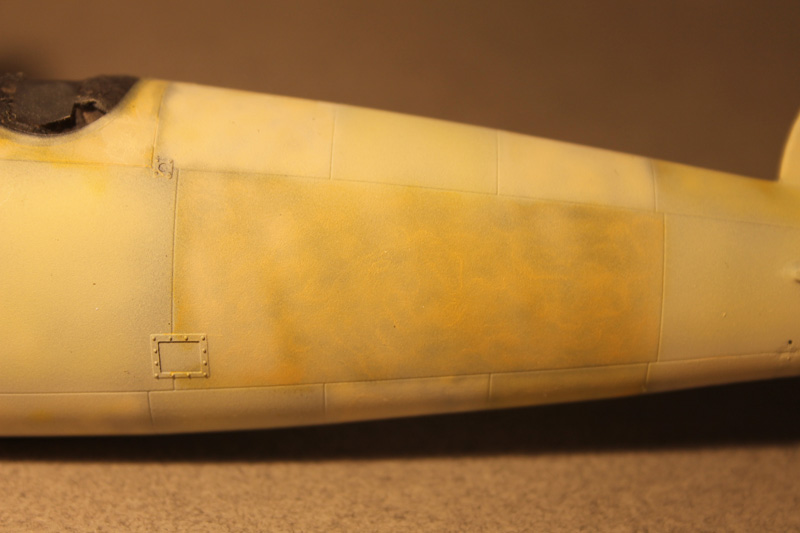
I has a blast free handing the panels with the AB. It really gave me a chance to play around. I used 4 Vallejo shades, Sand yellow, Radome tan, Sand and Natural Wood.
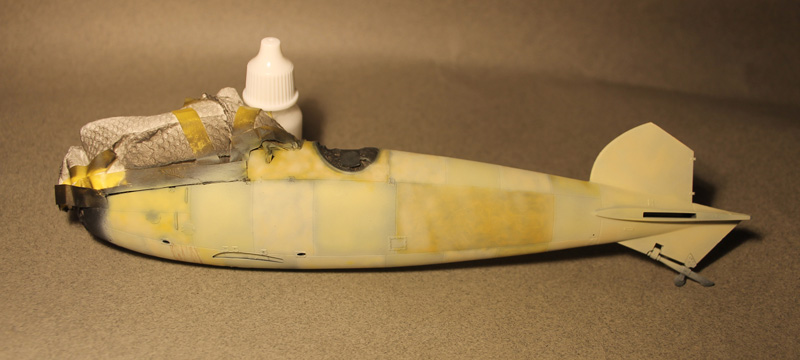
Here's a closeup of the mottling:
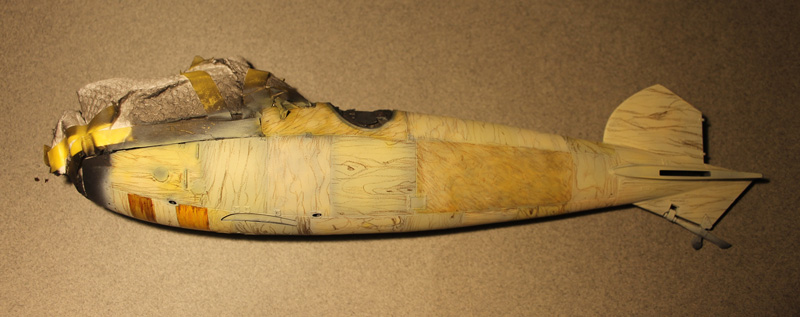
Then after a test, I scribbled a rough pattern with two shades of color pencils:
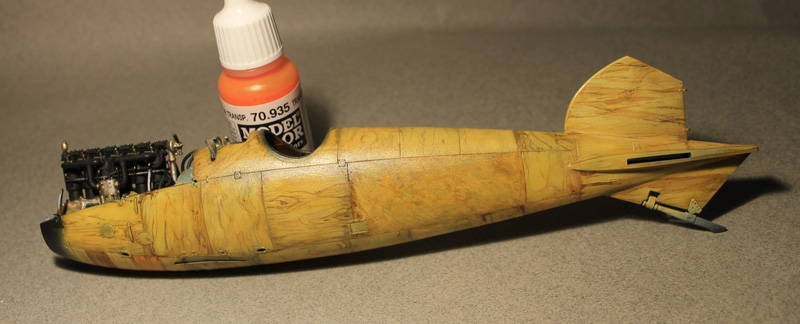
Then I went over each panel with transparent Vallejos: orange, yellow and smoke. I also hit up a few spots with the original colors via brush, then blasted the whole shebang with Future to get ready for decals.
I have to admit, I'm really enjoying this build, even the lozenge decals are cooperating so far.
Next is the detail painting and decals on the fuse and building the Spandaus.
Okay, I'm on to the wood.
I has a blast free handing the panels with the AB. It really gave me a chance to play around. I used 4 Vallejo shades, Sand yellow, Radome tan, Sand and Natural Wood.
Here's a closeup of the mottling:
Then after a test, I scribbled a rough pattern with two shades of color pencils:
Then I went over each panel with transparent Vallejos: orange, yellow and smoke. I also hit up a few spots with the original colors via brush, then blasted the whole shebang with Future to get ready for decals.
I have to admit, I'm really enjoying this build, even the lozenge decals are cooperating so far.
Next is the detail painting and decals on the fuse and building the Spandaus.

ausf
Master at Arms
Thanks Luiz and Mike.
It really just fell together. After looking at all the techniques out there, I just decided to jump in as simple as I could go.
The subject matter: shellaced panels of plywood really allows for a lot of wild patterns/colors. I'm not sure how accurate it is, but I'm just building this for fun and am using the artistic license whenever possible.
Sherman 18
Master at Arms
WOW just WOW! 
ausf
Master at Arms
Thanks guys, I appreciate the comments.
Tom, yeah the MicroSol is a huge difference in this since most of the surface area of the model is covered with layers of decals.
In terms of the Tamiya, I would think the results would be better. I'm a big fan of Vallejo, but their transparents aren't that good imo.
They are part of a set that includes smoke and a natural wood base and grain (used on the interior of this one), but for lights, etc, they kind suck. More opague and the colors are too vivid. I trid them on some convoy and tail lights at they don't look that good.
:drool
NAILED IT!
NAILED IT!
Swordsman
Active member

ausf
Master at Arms
Thanks Bob.
I really think I got lucky by being impatient and going with all Vallejo instead of trying oils. I'm determined to finish this thing and if I had to wait too long with drying times this would end up on a back burner, then shelf, then box...I don't think I could have pulled this off with the oil technique and the Vallejo dries so fast that this whole thing including the Future coat was done in one sitting in about an hour and a half.
The only hitch is I haven't received the turnbuckles yet. Since I ordered the 1/32 before I read the memo regarding them oversized, I may not use them anyway, but I'm not going to let them hold me up.
ausf
Master at Arms
Thanks T and Sword, missed you responses, respondingg to MP.
Movin' on...
Got some decals in (sometimes the wrong) place:


And the real hero of this build...MicroSol.

As they say on Gilligan's Island: 'And the rest...'
I messed up the Spandaus with annealing. I'm used to doing big thick 1/16 armor sheets, so the cooling jacket went cheery red before I could blink and the first attempt distorted a bit. No big deal, it is a machine of war, right?
The guns are just dry fitted right now (still need to be touched up) but it brings me to a point regarding WnW. This kit is so well engineered that almost everything sticks in place while dry fit. I'm using very little glue and have yet to have to fill anything with putty.
Next up, tailplane decals, detail painting and a bunch of Future in my future.
I have a question of you guys with the wings since I'm not up on either WWI or AC. I was thinking of toning down the color a bit with a filte/wash after I seal everything again. Is that a good idea or the stupidest thing you've ever heard? I really don't know. I assume the fabric would wear and fade a bit, but not sure.
Another question: I got the turnbuckles. I don't know what I'm looking at, so 1/32 seems okay with me to proceed. I plan on gluing the EZ line into the holes on the underside of the wing before assembly, then trimming and connecting to the turnbuckles after assembly, and CA'ing in place. I'm only going to use them on the bottom (meaning top of lower wing). Is that the way to do it?
Movin' on...
Got some decals in (sometimes the wrong) place:
And the real hero of this build...MicroSol.
As they say on Gilligan's Island: 'And the rest...'
I messed up the Spandaus with annealing. I'm used to doing big thick 1/16 armor sheets, so the cooling jacket went cheery red before I could blink and the first attempt distorted a bit. No big deal, it is a machine of war, right?
The guns are just dry fitted right now (still need to be touched up) but it brings me to a point regarding WnW. This kit is so well engineered that almost everything sticks in place while dry fit. I'm using very little glue and have yet to have to fill anything with putty.
Next up, tailplane decals, detail painting and a bunch of Future in my future.
I have a question of you guys with the wings since I'm not up on either WWI or AC. I was thinking of toning down the color a bit with a filte/wash after I seal everything again. Is that a good idea or the stupidest thing you've ever heard? I really don't know. I assume the fabric would wear and fade a bit, but not sure.
Another question: I got the turnbuckles. I don't know what I'm looking at, so 1/32 seems okay with me to proceed. I plan on gluing the EZ line into the holes on the underside of the wing before assembly, then trimming and connecting to the turnbuckles after assembly, and CA'ing in place. I'm only going to use them on the bottom (meaning top of lower wing). Is that the way to do it?