• Modelers Alliance has updated the forum software on our website. We have migrated all post, content and user accounts but we could not migrate the passwords.
    This requires that you manually reset your password.
    Please click here, http://modelersalliance.org/forums/login to go to logon page and use the "Forgot your Password" option.

hawkenstien 3...........finished

hawkenstien 3...........pit construction...step 1

well just another quickie update.

the more i looked at the pit area the more it just didnt fit my idea of what i needed to have so yesterday i spent some time with pictures, strip, and channel pieces.

this took me a couple of hours of intense study of a couple of pictures and several miscuts.

the result.....

pitfalls-3_zps0503f936.jpg

pitfalls-2_zps5ad36585.jpg


and ........

pitfalls-1_zps9504e5bf.jpg


tbh this isnt 100% accurate but it is something that i, after sitting and staring at the work i did and then the pictures, then the work, then the pictures..........for about two hours, can live with. i have just a couple of small stringers to add near the forward bulkhead.

so now i believe i can, with a smile, move forward to the pit.


ohh and i figure i will paint when i get towards the nose more so that i can get it all in one session.


comments, critiques, and criticism are very much encouraged.


joe
 
hawkenstien 3...........pit construction...step 1

So much 'hard work' happening here. No criticism from me, just admiration :good:

Ian
 
hawkenstien 3...........pit construction...step 1

many thanks for stopping in and all the encouragement. much appreciated.


joe
 
hawkenstien 3...........pit construction...step 1

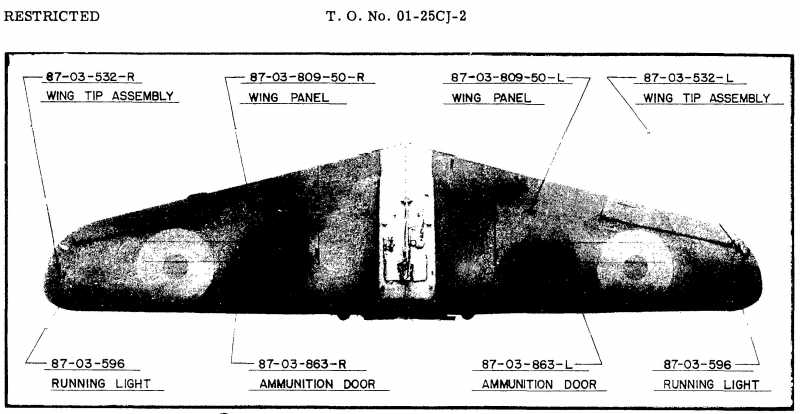
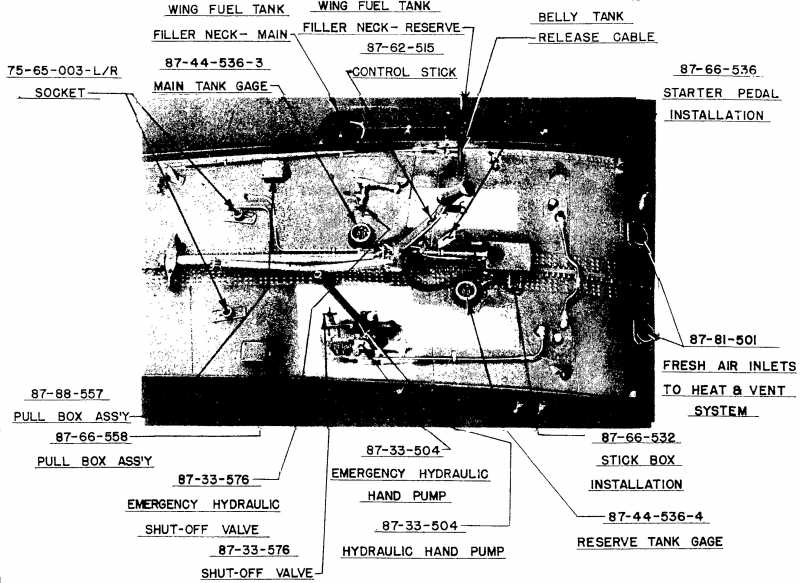
Well,you may want to kill me if it isn't there but the cockpit floor should be the top of the wing's center. I would think it easier to extend the upper wing panels to create the floor if it doesn't have it already. If it does have it already then simply add the control stick, hydraulic pump handles, and so on, to the wing's top center section.

h47dcedc.jpg


h4cbea6b.jpg


Regards (and don't kill me),
 
hawkenstien 3...........pit construction...step 1

saul kill you??? not hardly. actually it is more the opposite. i enjoy and look forward to what you post. for this build i did debate extending the wings through the pit but to be quite honest i am not sure, without much more cutting on the fuse sides, that i could accomplish it. so with that in mind i dropped the kit floor to the point at the top of the wings, or as close as i could get it. based on what will be seen i think i am pretty close. this may be a place that i need to be happy with what i have.

never believe that i am upset with you posting from your vault. i am very grateful. to be honest there are some individuals that i look forward to the comments they make, good or bad. your knowledge of the subject is something i count on.


joe
 
hawkenstien 3...........pit construction...step 1

Hi Joe, Continue to be very impressed with your craftmanship, just wonderful scratch work (y) (y)


Randy
 
hawkenstien 3...........pit floor and starboard

well folks it has been a while but here i am again.

pit floor and starboard side. sorry about the pics. white on white doesnt really go well. working off of a couple of drawings and photos. actually pretty happy. i have to add the map case yet but other than that......


pit-floor-and-starboard-side-1_zps61b2b1b0.jpg

pit-floor-and-starboard-side-2_zps98504d19.jpg


now i also redid the control stick. mind you the stick from the kit is not bad. in fact it is decent. i just......well.......i cant help myself.

control-stick-2_zps4b2274ea.jpg


and side by side with the kit piece.

control-stick-1_zps4257bbe9.jpg


now for the port side. hopefully in the next few days.


comments, critiques, and criticism are very much encouraged.


joe
 
hawkenstien 3...........pit floor and starboard

Thassright Joe, don't you let the mean Puppy bully you...

Ian
 
hawkenstien 3...........pit floor and starboard

Hi Joe, Awesome scratch work (y) (y) (y) (y) (y)


This is one of my favorite threads to check in on, keep it up!!!!


Randy
 
hawkenstien 3...........interior 50%

ok an update.

been playing a bit with this. just cant leave well enough alone.

worked on some of the thingymabobs and whachamajiggers that comprise the gadget type things in the pit. then i jumped ahead of myself and sprayed some paint.

i know better but i still did it.

so lets catch up shall we. first the fuel tank.

painted and some wear and tear.

painted-interior-7_zps773262d4.jpg

painted-interior-6_zpsdfe3c590.jpg


too much for one post i guess. 2nd part inbound soon.


joe
 
hawkenstien 3...........interior 50%

part 2

and then some gadgets, paint and just a start of weathering, staining, and wear and tear.

painted-interior-5_zps52aea4f5.jpg

painted-interior-3_zpsd1af3f63.jpg

paintedinterior2_zpsb7adce89.jpg

painted-interior-1_zpsbca2aad4.jpg


and then some more gadgets and painting in the pit. added just a bit of wear and tear for the flooring and such as well.

painted-interior-8_zps138971ca.jpg

painted-interior-10_zpsb03dc532.jpg

painted-interior-9_zps0dd6f198.jpg


dont look like much but it took a while. still a ways to go on this but progress is progress.


till next time.

comments, critiques, and criticism are encouraged.


joe
 
Back
Top