
-
Modelers Alliance has updated the forum software on our website. We have migrated all post, content and user accounts but we could not migrate the passwords.
This requires that you manually reset your password.
Please click here, http://modelersalliance.org/forums/login to go to logon page and use the "Forgot your Password" option.
You are using an out of date browser. It may not display this or other websites correctly.
You should upgrade or use an alternative browser.
You should upgrade or use an alternative browser.
hawkenstien 3...........finished
- Thread starter fightnjoe
- Start date
hawkenstien 3.............receiving now
Really good stuff!
As for wiring and plumbing, try solder and do not forget to use looms. During airframe construction either looms or tie down straps were used for cabling and pipes.
Regards,
Really good stuff!
As for wiring and plumbing, try solder and do not forget to use looms. During airframe construction either looms or tie down straps were used for cabling and pipes.
Regards,
fightnjoe
Active member
hawkenstien 3.............bad signal, repeat.....
well folks here i am again. tearing apart a model and then trashing my own work and restarting.
so after a lot of researching, a chat with a model builder that i have a large respect for, well.... a different plan was needed. so with that in mind i tore out all that was interior of hawkenstien. all the framework was removed. this allowed me the chance to grind out around the hatch door a bit to get it more to something that i like. then i used the tools at hand to try to get the framework right. i wanted to have a good foundation. still not sure it is right but it is closer than what i had before.
using one of those wire shape transfer thingies, a thick plastic for sale sign, paper, a scissor, a pencil, knives, and sanding material i began. i first got the general shape onto the paper and cut it out. i traced the shape onto plastic times two. cutting them out i glued one to the other and then rough shaped it, using lots of dryfitting to try to get it as close as i could. three sets plus three of the bulkheads were made. finally i had six builkheads i can use. they are still rough but they are a good general shape. as i do not have the entire side cut out these will work for what i need. i will clean them up though to make sure all fits the way it should.
pictures.


now before it is mentioned remember the bulkheads are glued in with white glue. just to try to give me the idea of what they would look like and what they still needed to have done. i also noticed that #4 and #6 are a bit off. they should be easy to get in line. my next session will be getting the spacing right and then trying to get some stringers on.
till the next time my friends.
comments, critiques, and criticism are encouraged.
joe
well folks here i am again. tearing apart a model and then trashing my own work and restarting.
so after a lot of researching, a chat with a model builder that i have a large respect for, well.... a different plan was needed. so with that in mind i tore out all that was interior of hawkenstien. all the framework was removed. this allowed me the chance to grind out around the hatch door a bit to get it more to something that i like. then i used the tools at hand to try to get the framework right. i wanted to have a good foundation. still not sure it is right but it is closer than what i had before.
using one of those wire shape transfer thingies, a thick plastic for sale sign, paper, a scissor, a pencil, knives, and sanding material i began. i first got the general shape onto the paper and cut it out. i traced the shape onto plastic times two. cutting them out i glued one to the other and then rough shaped it, using lots of dryfitting to try to get it as close as i could. three sets plus three of the bulkheads were made. finally i had six builkheads i can use. they are still rough but they are a good general shape. as i do not have the entire side cut out these will work for what i need. i will clean them up though to make sure all fits the way it should.
pictures.
now before it is mentioned remember the bulkheads are glued in with white glue. just to try to give me the idea of what they would look like and what they still needed to have done. i also noticed that #4 and #6 are a bit off. they should be easy to get in line. my next session will be getting the spacing right and then trying to get some stringers on.
till the next time my friends.
comments, critiques, and criticism are encouraged.
joe
hawkenstien 3.............bad signal, repeat.....
You go Joe!
")

You go Joe!
hawkenstien 3.............bad signal, repeat.....
If you need more references, speak up. I am simply afraid of overloading you as I can see you tearing the guts out yet again! Yet, if this is what you enjoy... go for it!
Regards,
well folks here i am again. tearing apart a model and then trashing my own work and restarting.
If you need more references, speak up. I am simply afraid of overloading you as I can see you tearing the guts out yet again! Yet, if this is what you enjoy... go for it!
Regards,
fightnjoe
Active member
hawkenstien 3.............bad signal, repeat.....
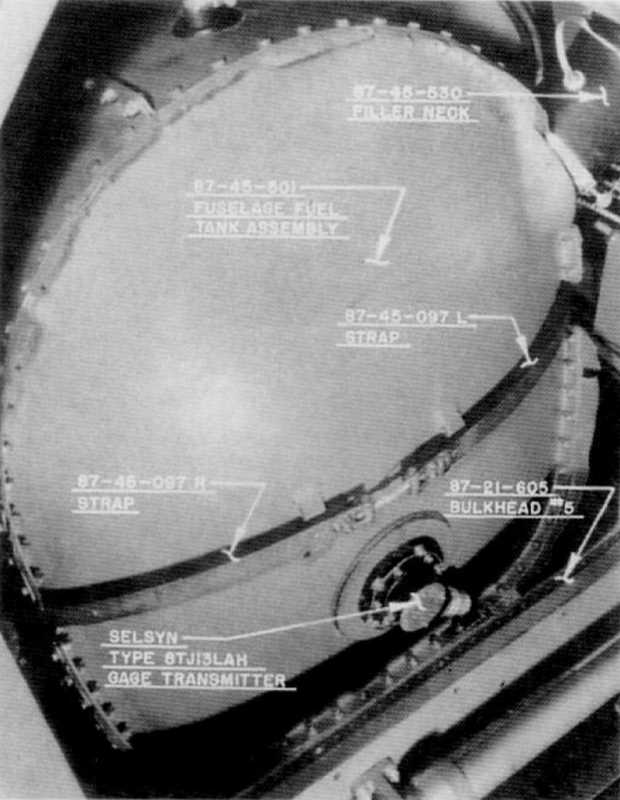
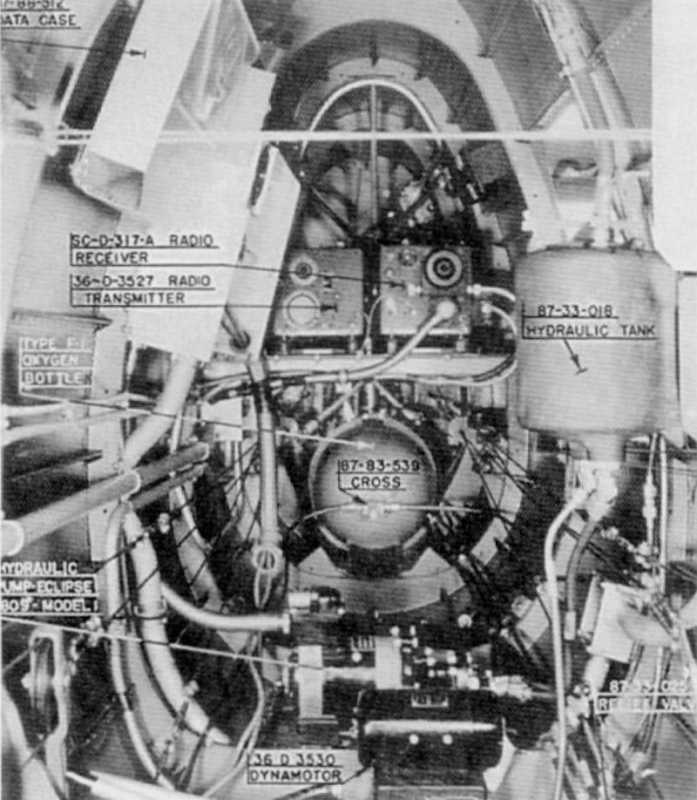
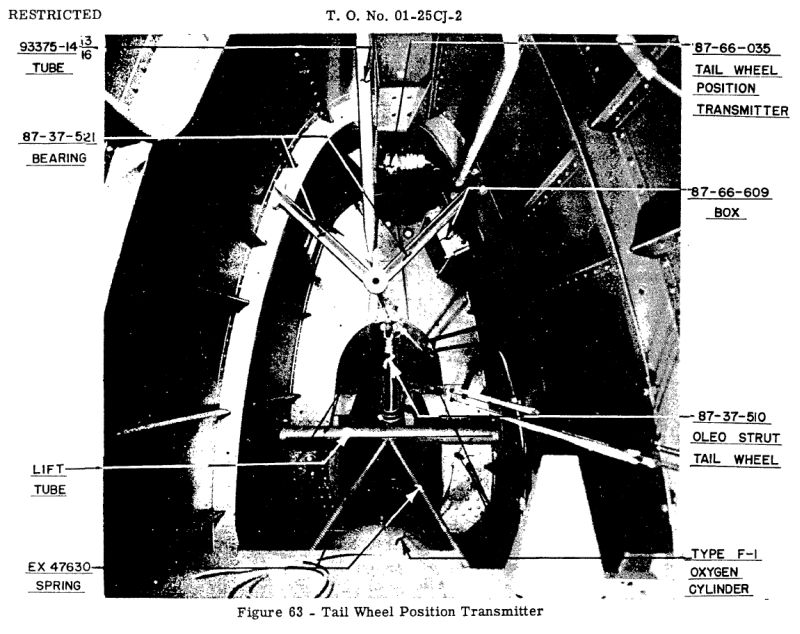
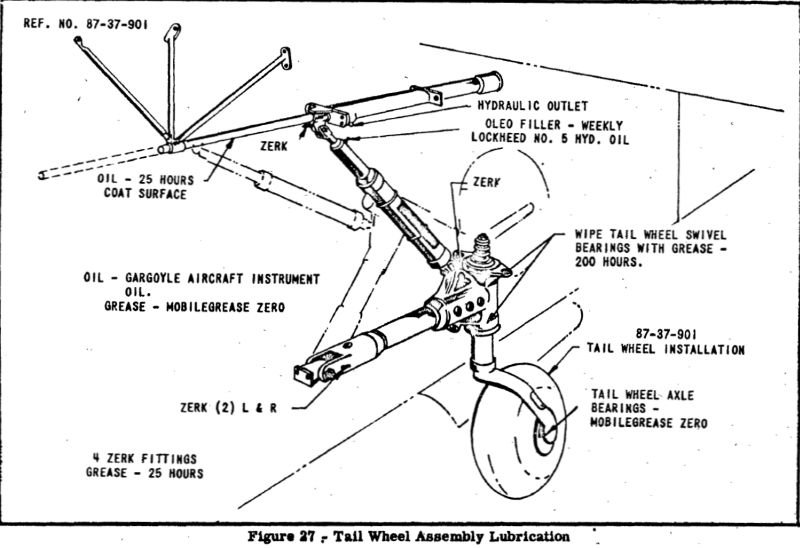
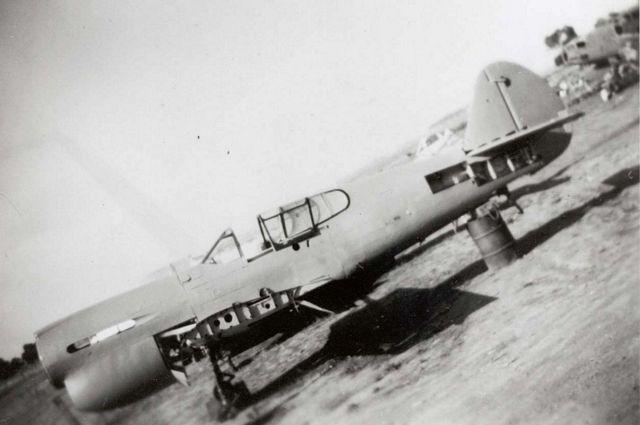
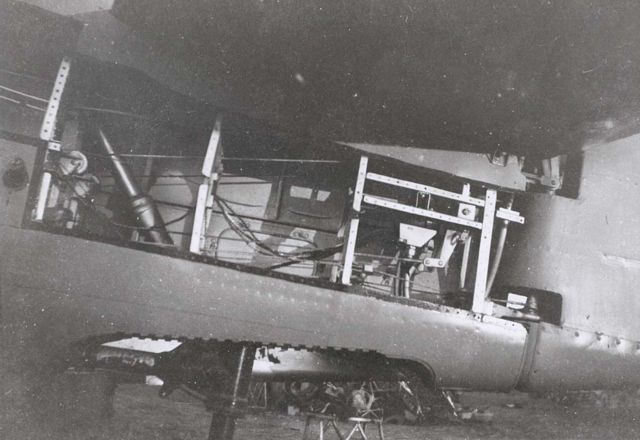
saul i can honestly say that i can never have too many references. i am daily surfing the net to find whatever i can on p-40's and i bookmark each page. just this past weekend i came across a photo of a fuel tank taken from near the access hatch. it showed the framework for the recievers pretty well. you have shared part of the wealth of refs that you have and i am very grateful. thanks to you i have pretty good refs now for the recievers and how they attach to each other and the a/c. if you have anything more on the battery, the framework, and the tail wheel assembly i would be in your debt.
thank you all for tagging along. i am happier with what i have now but stay tuned. you never know what will be found. something may show up that tells me i need to redo them again.
joe
hawkenstien 3.............bad signal, repeat.....
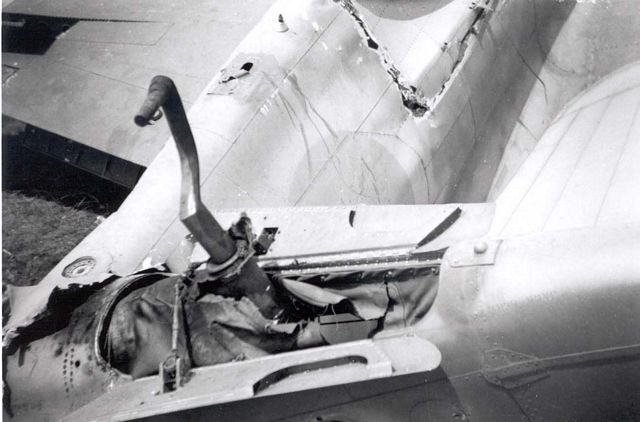
Careful what you wish for!
Battery


Bulkheads


What? You'd like a closer look at the open panels under the horizontal stabilizers?
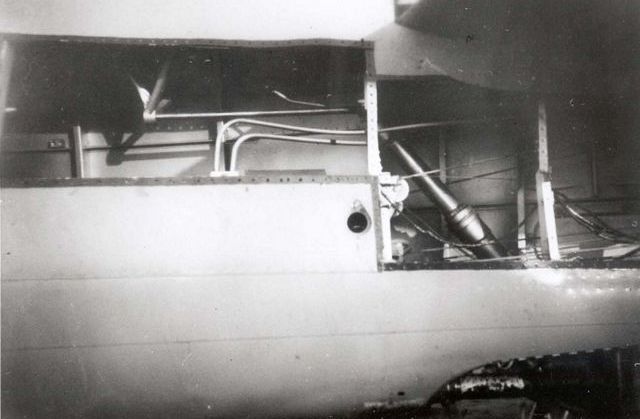
if you have anything more on the battery, the framework, and the tail wheel assembly i would be in your debt.
Careful what you wish for!
Battery
Bulkheads
What? You'd like a closer look at the open panels under the horizontal stabilizers?
fightnjoe
Active member
hawkenstien 3.............bad signal, repeat.....
now some will think this is a strange way to put this but..........
more, god please, more, lots more. more pics. please.
saul when i get to the home cpu i am going to save these with your permission. these are absolutely fantastic.
joe
now some will think this is a strange way to put this but..........
more, god please, more, lots more. more pics. please.
saul when i get to the home cpu i am going to save these with your permission. these are absolutely fantastic.
joe
hawkenstien 3.............bad signal, repeat.....
If you're referring to those in circles, they are part numbers to order replacements.
Regards,
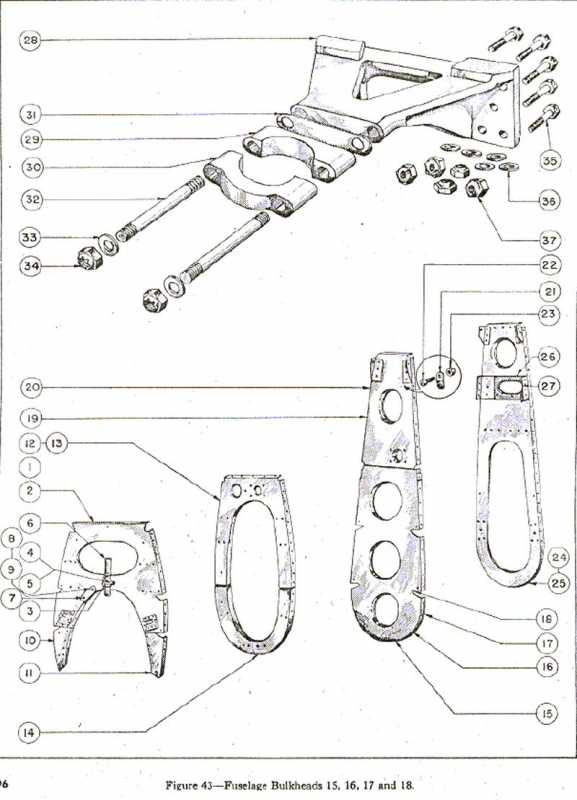
saul re the bulkheads. do you by chance have the descriptions of what the numbers indicate?
If you're referring to those in circles, they are part numbers to order replacements.
Regards,
fightnjoe
Active member
hawkenstien 3.............bad signal, repeat.....
thanks saul. been a rather busy couple of weeks. trying to take some time here and there for this build but all i seem to be finding is frustration. on my sixth rendition of the bulkheads. i just cant seem to get the look i am striving for.
joe
thanks saul. been a rather busy couple of weeks. trying to take some time here and there for this build but all i seem to be finding is frustration. on my sixth rendition of the bulkheads. i just cant seem to get the look i am striving for.
joe
fightnjoe
Active member
hawkenstien 3.............back to square one
well folks here i am. back to square one.
bulkheads.
after many attempts. many "failures", i have what i believe i can live with.
so,
out came the contour gauge.
out came the plastic "for sale" sign.
out came the sissors.
out came the drawings for the bulkheads as i eluded to earlier.
and after multiple attempts.


where the interior will be seen they have been notched to allow for stringers on the cut side. i believe i can now move forward and redo the interior additions.
all comments, critiques, and criticism are encouraged.
joe
well folks here i am. back to square one.
bulkheads.
after many attempts. many "failures", i have what i believe i can live with.
so,
out came the contour gauge.
out came the plastic "for sale" sign.
out came the sissors.
out came the drawings for the bulkheads as i eluded to earlier.
and after multiple attempts.
where the interior will be seen they have been notched to allow for stringers on the cut side. i believe i can now move forward and redo the interior additions.
all comments, critiques, and criticism are encouraged.
joe
hawkenstien 3.............back to square one
Well, I thought why did you tear it out but it does look better!
Regards,
Well, I thought why did you tear it out but it does look better!
Regards,
hawkenstien 3.............back to square one
fightnjoe
Active member
hawkenstien 3.............framing out...
just a quick update.
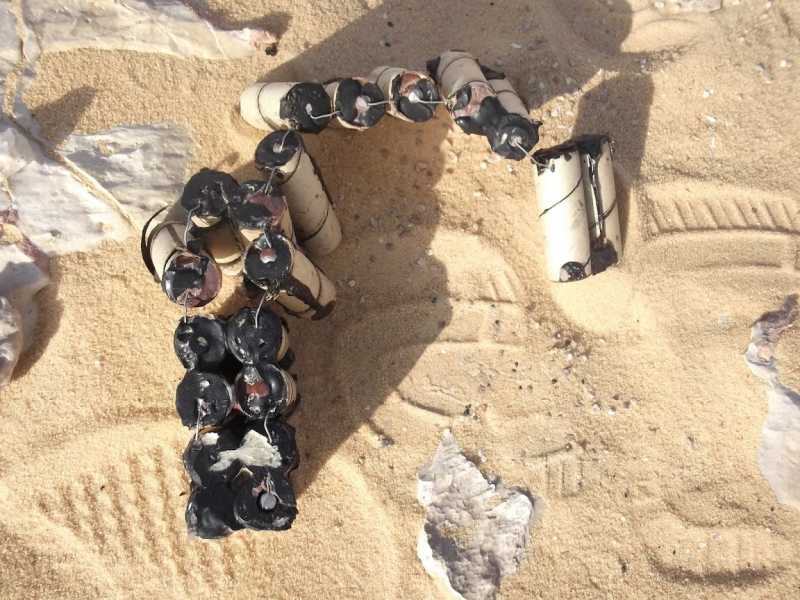
after the bulkheads i went back to the framing. now for that framing is needed for the radio, the o2 tank, the fuel tank, and some of the other fiddly bits. for that i started with the radio framing. using some .06 channel and .06 angle i began to form it up. two things come into play, needs to fill the space between the bulkheads 7 and 8, needs to be level. i measured, cut, measured again because i had short cut it, and finally cut the right length, glued, and let it set. while it set i started looking for an o2 tank. now this is different from the first rendition. i believe that what i am going for is more of an prewar to early setup. looking around i found nothing that would work. well then i saw one of the leftover 500 pound bombs from one of the 1/48 b-17 kits. i cut off the fin at the back and what do you know. pretty dang close. i cleaned it up and then found a rod that would work, cut a section off, split it, and then what do you know, i have the beginning of framework for the straps for holding it in. i next went to the radio transmitter/reciever. the set i had tried to replicate before was a scr 274. for my mind set now that wouldnt work. so i got to looking and tracked down the model that was replaced with the scr 274, that would be the scr 183. had to start from scratch. still pretty simple it seems.
well that is what has happened over the last couple of days. now for picture documentation.
the radio sets.

they actually look decent compared.
http://www.radiomilitari.com/scr183.jpg
i did rework the fuel tank just a bit. then white glued the little bits i have gotten some work on into place to see where i am.


to my eye this looks better. still some clean up on the o2 tank. for that area the real test will be when i start to hook everything in.
i have to redo the hydrolic oil tank, battery, dynamotor, and hydrolic pump. just taking things in step right now. when i get to hooking everything up i will be able to pull the sections out including the bulkheads and work with them.
so on to the next.
comments, critiques, and criticism are encouraged.
joe
just a quick update.
after the bulkheads i went back to the framing. now for that framing is needed for the radio, the o2 tank, the fuel tank, and some of the other fiddly bits. for that i started with the radio framing. using some .06 channel and .06 angle i began to form it up. two things come into play, needs to fill the space between the bulkheads 7 and 8, needs to be level. i measured, cut, measured again because i had short cut it, and finally cut the right length, glued, and let it set. while it set i started looking for an o2 tank. now this is different from the first rendition. i believe that what i am going for is more of an prewar to early setup. looking around i found nothing that would work. well then i saw one of the leftover 500 pound bombs from one of the 1/48 b-17 kits. i cut off the fin at the back and what do you know. pretty dang close. i cleaned it up and then found a rod that would work, cut a section off, split it, and then what do you know, i have the beginning of framework for the straps for holding it in. i next went to the radio transmitter/reciever. the set i had tried to replicate before was a scr 274. for my mind set now that wouldnt work. so i got to looking and tracked down the model that was replaced with the scr 274, that would be the scr 183. had to start from scratch. still pretty simple it seems.
well that is what has happened over the last couple of days. now for picture documentation.
the radio sets.
they actually look decent compared.
http://www.radiomilitari.com/scr183.jpg
i did rework the fuel tank just a bit. then white glued the little bits i have gotten some work on into place to see where i am.
to my eye this looks better. still some clean up on the o2 tank. for that area the real test will be when i start to hook everything in.
i have to redo the hydrolic oil tank, battery, dynamotor, and hydrolic pump. just taking things in step right now. when i get to hooking everything up i will be able to pull the sections out including the bulkheads and work with them.
so on to the next.
comments, critiques, and criticism are encouraged.
joe
hawkenstien 3.............framing out...
Your builds look better all the time Joe. I like what you are doing here. One thing to look out for with the Trumpeter kit is the cockpit. For some reason Trumpeter shrank the height of everything by about a 1/3 But there are aftermarket sets that fix that problem if you want to go that route.
Your builds look better all the time Joe. I like what you are doing here. One thing to look out for with the Trumpeter kit is the cockpit. For some reason Trumpeter shrank the height of everything by about a 1/3 But there are aftermarket sets that fix that problem if you want to go that route.