• Modelers Alliance has updated the forum software on our website. We have migrated all post, content and user accounts but we could not migrate the passwords.
    This requires that you manually reset your password.
    Please click here, http://modelersalliance.org/forums/login to go to logon page and use the "Forgot your Password" option.

MkIV Female Heavy Battle Tank by EMHAR 1/35

I feel really humbled, MP, Luiz, Ian mate, all these compliments from folks way ahead of me in our hobby really mean a lot so thank you one and all.

The tank is still to go through more weathering. The beam needs a lot of attention, one of the chains is 0.5mm longer than the other so I have to fix that too.

I also made a stupid mistake on the stones so a fair bit of fixing involved ...that's what happens when you don't bloody read properly - really :vmad :vmad :vmad I painted them too dark, they need to be MUCH lighter than that so off to work Laurence :smack

Cheers,

Laurence
 
Found this Lawrence and have been thinking about one for my Mk IV Male or Female.

MC35105_CRIB_Large.JPG


Produced and sold here http://members.tripod.com/model_cellar/MC35105.htm
Just doesnt seem like a very good ordering system though.
James
 
That's got 'intimidating' written all over it.

Imagine you're young German conscript, never left your little farming community in the Schwarzwald before, you've been on the front-line of a war you don't really understand for just a few days and suddenly this appears above your trench....

Ian
 
That's got 'intimidating' written all over it.

Imagine you're young German conscript, never left your little farming community in the Schwarzwald before, you've been on the front-line of a war you don't really understand for just a few days and suddenly this appears above your trench....

Ian
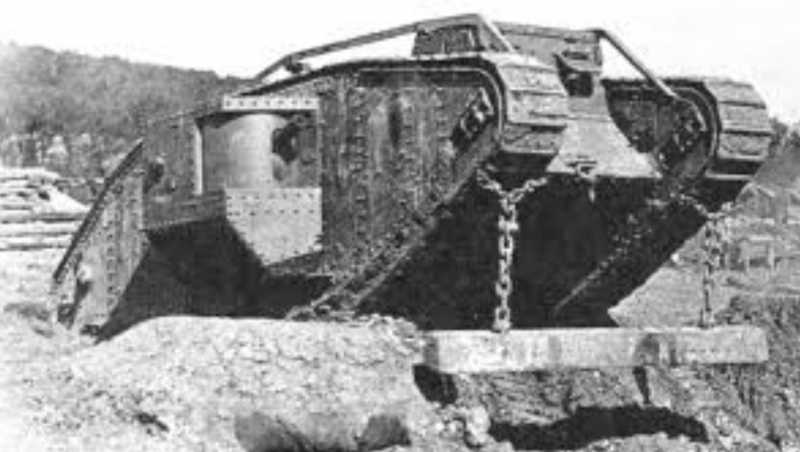
Well he surely does not need a lavatory anymore does he :D
 
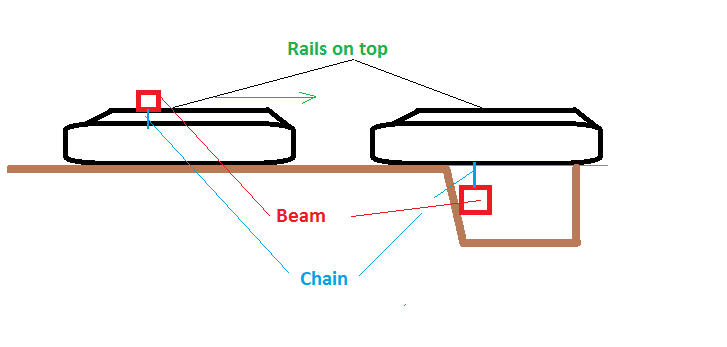
What was that wooden bar on the chains used for?

They called it the unditching beam. Funny thing that was ...the tank had rails on top, that beam was attached with chains to the tracks and moving as the tank was moving forward. It was meant to help the tank through totally muddy terrain and mainly with crossing a trench. When deployed, it would have eventually been stuck against the front trench wall hence pushing the tank forward.
These beasts were very heavy, over 20 tons, way under powered so they needed all the help they could get. ANother very popular choice for crossing trenches were the fascines - a huge roll on top the tank, on the rails at the front.

Hope I got this right :D

Laurence
 
I've tried to do a sketch - see below

With the tank moving forward, beam attached to the tracks with thick solid chains, the beam would move forward along the rails when on top and underneath when below. When the tank came across a trench, the beam would eventually be placed against the wall, tracks would be moving the tank forward. When the beam is flush against the trench, the tank would be pushed forward, compensating for the lack of solid ground underneath most of the length of the track.

THe beam was wider than the tank allowing for both tracks to "step on it". Also provided support in very muddy flat terrain.

At least, this is my understanding of them using this hi-tech device :D

hb99f41c.png


Picture of the real thing below

h0b12bb2.JPG


Laurence
 
I get that but what does the beam do just hanging in the air in the trench that gives the tank more traction? Also takes a bit of timing for the beam to end up in the trench of ditch doesn't it? To me it looks like it would be more of a head knocker for the blokes in the trenches. Guess I'm being a bit dense here, just not following how it works.
 
If the tank stops moving forward and the tracks just do nothing, then the beam will get "into position". Think of the wheels on a vehicle spinning on ice without pushing it forward. If there was a "one link chain" around the wheel, it would eventually touch the ice and do the job.

I suppose the beam was also good at clearing barbed wire defenses as well as hitting the enemy soldiers in the head :woohoo:
 
Ah I gotcha! Thanks for sticking with this. So it's not just giving it traction, the chain/beam acts like a "Come Along" Winch. Beam gets wedged on something and tracks keep moving, chain tightens up and pulls the tank forward. Gotcha..:soldier
 
Spot on mate that's how it worked. (y)

There were shortcomings too - because the chains were attached to the tracks, if the tank turned, then the beam would have moved at an angle too. Work that one out :D :D :D

I know the beam was not permanently deployed but rather when needed, however, the "when needed" usually involved enemy fire - geez can't win with this darn thing, can we :drinks :drinks :drinks
 
Hope you dont mind me butting in here, but I have been trying to find out more about [strike]the unditching beams. They were used if the tank became mired and the crew would have to attach them usually under fire. Then the tank would have something to grip as it ran over it. To cross trenches they used Fascines attached to the rails on the roof. These were either brush sticks bundled with chain or crib fascines.[/strike]
Okay another source says the fascines were first and then the unditiching beam came next for crossing trenches.
http://www.tanks-encyclopedia.com/ww1/gb/tank_MkIV.php

Man its hard to find info.

I'm trying to find more info on the beam though to see how else they could be used.
James
 
Not a problem James, info is always welcome, thanks for the details.

Terry, thanks for the compliments, appreciate it :D


Laurence
 
Two months since I started this one ...geez :smack

Progress pics - almost assembled, except for one rail at the top and the tracks. Lots of filling and sanding, the nice part is that you don't get a zillion wheels to do :D


Images snipped.

One thing I am not sure of is the exhaust pipe at the rear - the instructions say bugger all about it :vmad

Thanks for looking

Laurence

Shalom.

I went looking and found this on You Tube. It's a 1:1 scale replica Mk. IV Male. At the 5:10, 5:40, 6:00 and 6:20 (6:20 shows exhaust smoke too) marks on you can clearly see the exhaust pipe. At 8:15 there's a great overhead rear shot of the exhaust. I hope this helps you.

https://www.youtube.com/watch?v=9sEVsuER2GM

Lots of images for weathering ideas there too.

Cheers from Peter
 
Back
Top