• Modelers Alliance has updated the forum software on our website. We have migrated all post, content and user accounts but we could not migrate the passwords.
    This requires that you manually reset your password.
    Please click here, http://modelersalliance.org/forums/login to go to logon page and use the "Forgot your Password" option.

Logistics, Base & Buildings, Updated Feb. 13, 2020

Logistics, Base & Buildings. Updated March 1, 2019

Great news Bob! :good: , I´m very glad to listem them...take care my friend...,soon you´re modeling again :eek:ldguy

Regards!

Luiz.

Thank you Luiz. I am much better and I intend to get back on the bench shortly!

Bob
 
Logistics, Base & Buildings. Updated March 1, 2019

Well, here it is 20 months after I was diagnosed. Man! That little bout with cancer took some time I really couldn't afford! I'm no spring chicken any more!

Anyway, so glad to be posting on this diorama again! As I mentioned in a previous post in March, I was planning the addition of two more structures for this diorama. The reason? I just felt the diorama needed a couple of additions to make it live up to it's name, Logistics. I want this to be so busy, so much going on, that nobody will be able to take it all in on one visit.

I'm starting with a cutaway of a Hauptbahnhof, (Main Train Station). The tracks, covered in a ruined train shed, glass covered, across the front of the diorama, needed something but imagination to take the viewer's eyes to the terminal. My plans are difficult to describe, especially at this point. I can see it all in my mind, but, as I said, it will be difficult to explain until I get further along. I'll start where I lefty off in March. Back then, I only had the energy to cut the wall where the shed was to be mounted to make a space for the station. I left the saw where it would end to illustrate the size of the cutaway!.

00000~15.JPG


So far, I have removed the details from the portion of the wall that will become the train station.

0909~0.JPG


Then, I began cutting the corrugated cardboard that I make the basic shape of my buildings with. I add some bracing and cutouts where doorways and three floors of windows, doors and balconies will be that overlook the Grand hallways..

0900~0.JPG


Then I test fit to make sure it will fit when completed.

0908.JPG


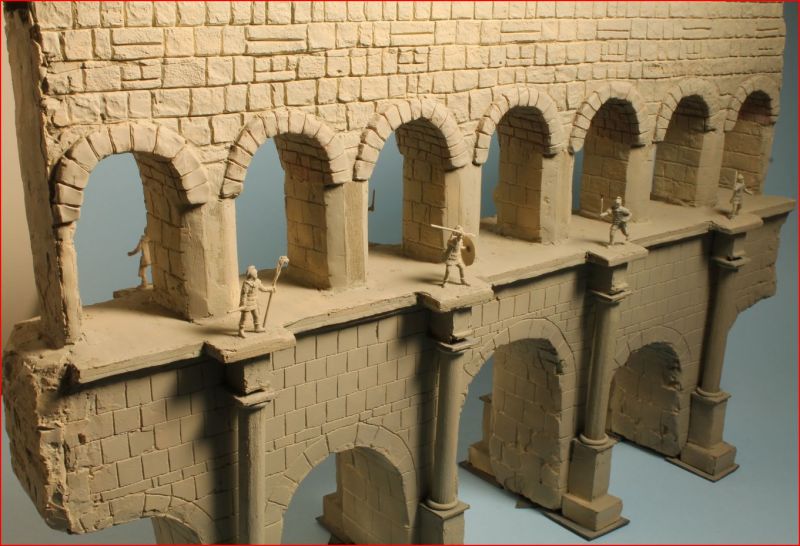
Test fit the new walls. The walls on the side will not be completely intact. When complete, they will be about a half inch thick, partially ruined, exposing the interior bricks which were clad with granite on the outside and plaster on the inside. I do that with red plaster cast 1/35th scale bricks that I cast from dyed plaster cast into molds.

0800~0.JPG


Then the walls and flooring are test fitted. Once I have all those parts cut and fitted, then I can go ahead and add the materials that will make them appear as real structures.

9000.JPG


Then I cut and am test fitted some of the details that will decorate the front wall.

I started building dioramas in the 1970s. I always include a lot of architecture because I like urban dioramas, and, being mostly European, they are usually very ornate. Since then, I have found some, bought some and scratched some, all of which I put into RTV rubber for future casting. I have hundreds and hundreds of these parts, plus about 100 molds, each with multiple parts, to cast more when I need them. When I go shopping with Susan, she is looking at girlie stuff and I am looking for shapes and forms that I can use directly or modify for architectural parts. You would be surprised where I have found them. Many in places you would never think of. See, shopping with your wife does have benefits! :)

Believe me, before this is complete, it will have a lot more detail than shown here. Balconies overlooking the grand halls where, before the battles, were full of passengers going to and from trains. For this diorama, there will be several American G.I.s looking through the rubble and foreign war correspondents taking photos.

0808.JPG


Another angle.

0809.JPG


That's it for today. Thanks for looking in. I'll be back shortly with another update!

Bob
 
Logistics, Base & Buildings Updated Sept. 23, 2019

Good to see you building again Bob! I really like the step by step you just posted. As I have seen "Logistics (in process)" a couple of times, it is interesting to see your process and materials for the buildings.

That was also a big change to that corner. I will be curious as to what the back side of the "wall" will look like as it is the corner of the dio.

Thanks Paul,

I use the same old method I have always used. It's what I do to all my dioramas where the buildings run off the base. I cut them at the edge of the base whether they are square with the base at at an angle to it. Then I use gray matt board that covers all the lower sides of the base itself as well as extending upwards on the buildings that are cut so as not to extend beyond the base.

Remember when you visited, You looked at the back of the hotel on Legacies for example. All you could see was the gray mattboard except where the interior hotel floors were. Those were "windows" cut out of the mattboard. Obviously, in this one, there can be no detail to make a window as all the detail will be seen from the front of the diorama. Does that make sense?

You have to remember I was a "closet modeler", for years. I had to come up with my own ways of doing things. I learned early on that if I built the buildings to fit perfectly on the diorama base, it made them look contrived as well as contained on the base. Years ago, I built them on the edges of the base that in reality would extend beyond the base and that was what I came up with to do with the back half of a buildings on the edges of the diorama base. Its hard to explain, I could show you easily if you were here.

Note the gray matt board in this photo. It surrounds the diorama on the lower wooden base and extends to the top of the buildings that art cut. Since there was a lot of room to finish the interior, I created an interior. On other buildings in dioramas such as this one, I won't have sufficient space as all the detail of the main hall will be visible from the front of the diorama.

Interior.jpg


Bob
 
Logistics, Base & Buildings Updated Sept. 23, 2019

I do remember some of that Bob. It will still be really good to see the new stuff added.

Of course there was a little of this..

Aughhhh.gif


when you cut out the corner.

smile.gif
 
Logistics, Base & Buildings Updated Sept. 23, 2019

Gonna be good I think.

:popcorn
 
Logistics, Base & Buildings Updated Sept. 23, 2019

I do remember some of that Bob. It will still be really good to see the new stuff added.

Of course there was a little of this..

Aughhhh.gif


when you cut out the corner.

smile.gif

Hey Paul,

That was funny!!!!! When I tear into something like that, I know the feeling! But, sometimes you just have to close your eyes and go for it. Sometimes it can be a mistake, but mostly not. On this, only time will tell! :) If worse came to worse, I could always redo it the old way, that would not be difficult at all!

Bob
 
Logistics, Base & Buildings Updated Sept. 23, 2019

Oh, the memories .... corrugated cardboard - matt board - plaster of Paris - carving the whole thing - Vallejo Stone Grey - Raw Umber "treatment" - dry brushing - straightforward - easy to remember :D :D :D


Remember this one? Took me few months to put together and it's so flat and boring compared to your buildings :blush:


h5619c15.JPG


Looking forward to this Hauptbahnhof coming to life :notworthy :notworthy :notworthy


Laurence
 
Logistics, Base & Buildings Updated Sept. 23, 2019

Oh, the memories .... corrugated cardboard - matt board - plaster of Paris - carving the whole thing - Vallejo Stone Grey - Raw Umber "treatment" - dry brushing - straightforward - easy to remember :D :D :D


Remember this one? Took me few months to put together and it's so flat and boring compared to your buildings :blush:


h5619c15.JPG


Looking forward to this Hauptbahnhof coming to life :notworthy :notworthy :notworthy

Laurence!

Laurence

Hey Buddy,

The reason it doesn't look all that great is because you never finished it!

It has a lot of potential, but, you have to finish it. The weathering makes or breaks a model, especially a building!

Get yourself settled in your new city and get back to the bench!!!

Bob
 
Logistics, Base & Buildings Updated Sept. 23, 2019

Got some more done to the stain station facade.

I used a couple of 135th Construction Battalion masonry balconies, (One of the 15 manufacturing labels the VLS Corp. made in house). On one i just used the Box art which i had built and painted years ago. The other, I combined two of the same balcony and converted them into a single unit.

The first one is the box art I used as is. Here is a photo of the label.

Scan~0.jpeg


Then, here is a copy of the label of the smaller one. I built and painted all the box art of that company's more than 100 products back in the day. I took two of the kits and after a lot of cutting and test fitting, came up with the one you will see on the layout below.

Scan_1~0.jpeg


I came up with a marble pattern that is common in Germany. Then I scanned it, enlarged it and used high gloss printer photographic paper to print it on. I will affix it to a sheet of matt board the same size, let it dry, then cut "tiles" about an inch square that will serve as the marble face of the Facade.

888_copy.jpg


Then I will copy that marble design onto the columns, balconies and trim as I have done in other dioramas using shades of red paint, red micro pens, and washes to duplicate the marble pattern. Here is an example I did using the same procedure with a Napoleonic shadow box. The only difference in the two was that after I created the marble sheet for the shadowbox, it was used to make a self adhesive product that we marketed and I used for the walls. However there is no way to use a flat paper to fit the compound curves of the corinthian columns, so, I used the same technique painting them.

Limits6copy.jpg


Now, This is a real facade of the interior of a German train station. I am using the center section as a basic idea for the one I am building. This will NOT be a copy, but only using it for inspiration and it will have a vaguely similar appearance when finished, not anywhere near identical, but about as busy.

88888_copy.jpg


I am nearing completion of the components. None have been glued in place as yet, they are just laying on the facade as they will be when finished, of course, they will be squared up and true. This is just to give you an idea where this build is going. And, yes! Those Column bases are made from Legos. I will veneer them with sheet styrene and then do the marble thing with them. I always keep lots of Legos around for large scratch pieces that need to be sturdy!

999~5.JPG


Another angle!

998~0.JPG


As this diorama will be set in the German state of the Rhineland-Palatinate in central Germany, I will use that state's coat of arms and flags inside the station/

Unknown_copy.png


\Moving along! I have one of those weeks that isn't filled with medical appointments, (I just love these Golden Years!), so I hope to get a lot done on this within the next 7 days!

Thanks for looking in,

Bob
 
Logistics, Base & Buildings Updated Sept. 29, 2019

As many have already stated.....AWESOME!!

Nothing like watching a master at work :notworthy

:v
 
Logistics, Base & Buildings Updated Sept. 29, 2019

wow Thats is awesome

Thanks Dave, I couldn't tell if anybody else could see where it's going yet! It's at that awkward stage! :)

Bob


As many have already stated.....AWESOME!!

Nothing like watching a master at work :notworthy

:v

Where's the master????? I wanna see too!

Thanks Eric, it doesn't look too masterful at the moment! But thanks anyway!

Bob
 
Logistics, Base & Buildings Updated Sept. 29, 2019

Fancy. :dude

Thanks John!

More fancy coming up!

Been painting. The base coat for the pink marble is a camouflage Gray, cloud painted with a matt white.

88~4.JPG


8~1.JPG


I skinned out the blocks of Legos with sheet styrene and then added sone strip styrene trim. They will need to be sturdy to bear the weight of the resin casted columns.

888~2.JPG


There will be a lot of gilded architectural forms. I base coat them with flat black. Then all wooden architectural pieces I base coat with a flesh colored water based paint.

899~1.JPG


So, here are the base coated Corinthian columns, the side trim of the main hall entrance, a cap for the top of the structure, the two large "Lego" blocks that will support the columns and the clock face which will undergo a lot of changes before it is mounted.

8888~1.JPG


Then the arches for the two rounded openings, the entrance doors that will be at the back of the structure and give it some perception of depth although it will be strictly an illusion. Four supports for the balconies, Two balconies, and some concrete railing as trim.

89~3.JPG


The third set consists of architectural parts to be gilded in black, and the simulated wooden pieces, at least so far, in flesh color.

899~1.JPG


Lots more to come on this build!

Thanks for looking in!

Bob
 
Back
Top