
-
Modelers Alliance has updated the forum software on our website. We have migrated all post, content and user accounts but we could not migrate the passwords.
This requires that you manually reset your password.
Please click here, http://modelersalliance.org/forums/login to go to logon page and use the "Forgot your Password" option.
You are using an out of date browser. It may not display this or other websites correctly.
You should upgrade or use an alternative browser.
You should upgrade or use an alternative browser.
A couple of 1/48 Tamiya F-16s in FMS colors
- Thread starter Skinny_Mike
- Start date
centaur567
Well-known member
There's another town called Between. It's between Athens and Loganville off of I-78. Gary
Skinny_Mike
Well-known member
Hi Mike, I've been away from there for about 10 yrs now. We lived in Rockledge/Viera and I worked at Jess Parrish hosp. Rick Bellanger was the club pres. back then. rbellanger@att.net Don't know it it's current. They put on a good show so go and enjoy yourself. BTW your doing a great job on your F-16's. Gary
This is really scarey Gary - I actually live in Viera myself, on the East side of I95.
Oh - and thanks, I am hoping to get this Viper done in time for the show in June.
Skinny_Mike
Well-known member
Sorry for the highjack Mike.
No worries Bob - I think Gary and I have highjacked it already! :drinks
Skinny_Mike
Well-known member
McGuyver!
Thanks! I do actually love that this came together pretty well. Here is the ironic part about the save, I stole the parts from the Kinetic F-16 MLU kit. For those of you that don't know, the MLUs are older F-16A/Bs that have had a lot of the avionics brought up to the Block 25/30 standard but are structurally unmodified. That's important because the base of the tail is shorter/smaller for the A/B version instead of the C/D version. Its one of the critisims of the Kinetic F-16 kits, but I'm not complaining because it saved my bacon. But for all you rivet counters out there, you have been warned!

Nice!...
Luiz
Thanks Luiz!
Nice so far
James
Thanks James! B)
centaur567
Well-known member
Hi Mike, Small world. We lived in the Herrin's Landing subdivision. Gary
Skinny_Mike
Well-known member
Hi guys, well I have a bit of an update here today, I was originally trying to get this finished for a group build on another site, but as with every other group build I enter, I never quite get done on time. I was hoping to take this to the local show this weekend too, but I’m just not going to get there. Truthfully, I would rather have a well-done model in the display case then a rushed build on a competition table anyway.
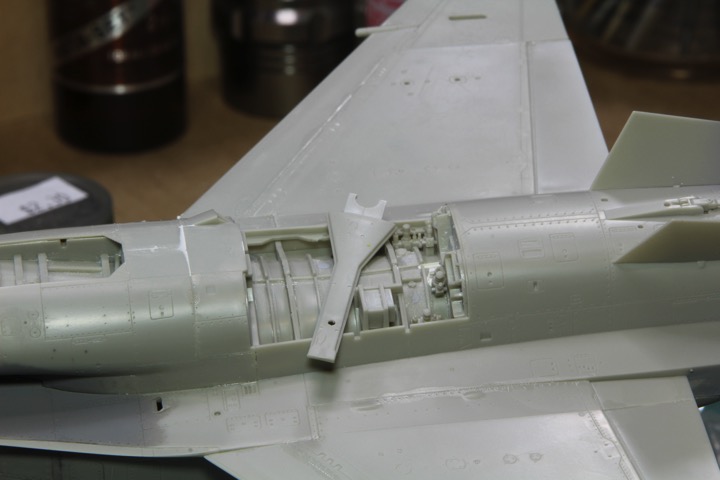
Here is the progress! This has been a fairly challenging build, and lately it really seems like it’s a few steps forward followed by a step backwards, especially with the aftermarket. I’m not going to spend a lot of time on the kit parts here, it’s a Tamiya F-16, the fit is good and everything goes where its supposed to with limited fuss. I have found myself referring back to the instructions from my Block 50 build, just to make sure that I have the right parts installed where they are supposed to go since this kit is technically for every block but a block 52! One modification I did however was to modify the part of the lower fuselage that goes over the MLG bay to allow me to add it later. One thing I dislike about the Tamiya F-16, really the only thing, is having to add the MLG before assembly is complete, just makes it hard to paint and there is the risk of damage. I saw this technique somewhere else and thought I would give it a try. So I modified the attachment ring so I can slide it all together at the end.
Lets talk about the aftermarket mods. First off the engine. My intent was to use the Eduard PW motor. Its actually not too bad looking. My resin had a few bubbles but nothing a little CA glue wouldn’t clean up.
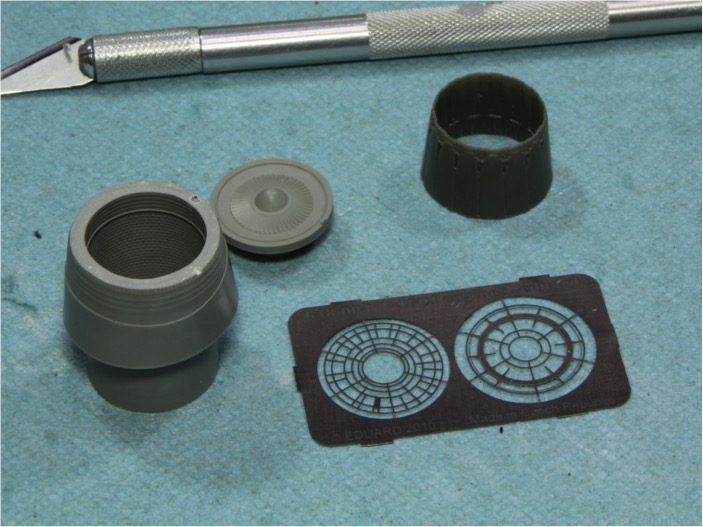
Now here’s the issue, well issues really, first of all the casting is wrong. The portion that is supposed to attach to the fuselage and contains the end of the burner can (the part that the tail feathers attach to) is actually correct for the Block 50 GE motors not the PW motors. In Eduard’s defense, the kit part of the donut is actually also incorrect, its for the GE motors as well. Truthfully I could have lived with this, if that was the only issue. Generally I’m the only one looking at my models when they are on the shelf and no one else that might has any idea what I am even talking about. Which brings us to problem #2, the diameter of the ring, where it mates to the fuselage is also incorrect. It is two small and its not the same shape. Ugg. After spending some time thinking about the problem, I thought about trying out an Aires PW motor for the Tamiya kit, oddly enough the donut fight perfectly and its all the correct type for the PW motors. So much for the shrinking Aires resin! Here is a comparison of the three with the aires parts in the background.
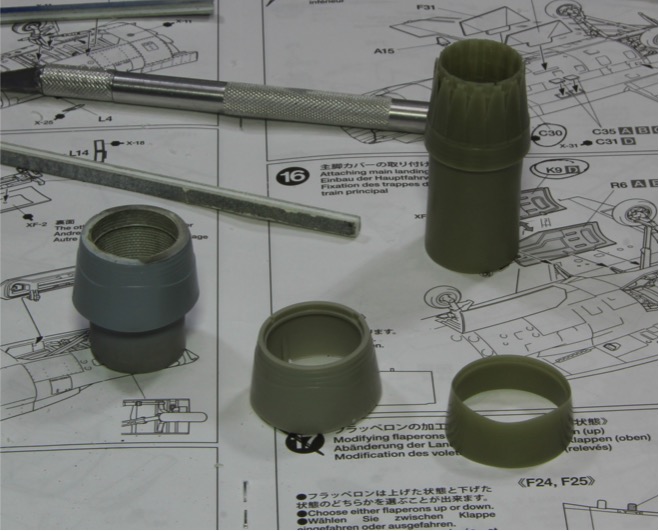
Wolfpack is on the left with the Aires on the right and the kit part in the middle.
I installed the ring and cleaned up my crooked sanding lines. Sorry forgot to take a picture of that part installed. Once all that was cleaned up, I painted the underside of the tail and the top of the engine donut in MM FS35237 because it will be much harder to paint those when assembled. Then I installed the tail and puttied the few little gaps at the join.
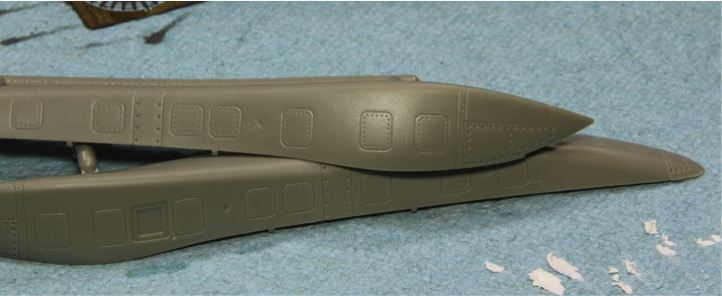
Next up was the nose. I used a Royale resin nose, which is one piece. This allows you to keep the zipper on the top of the nose as opposed to the two piece nose in the kit. I added a metal pitot tube from Hobby Decal. I always break off the plastic pitot tubes, so I am going metal wherever I can. There were some gaps between the radome and the fuselage (I was a little heavy handed with the sanding sticks) which I am currently waiting on the milliput to dry before sanding it down.

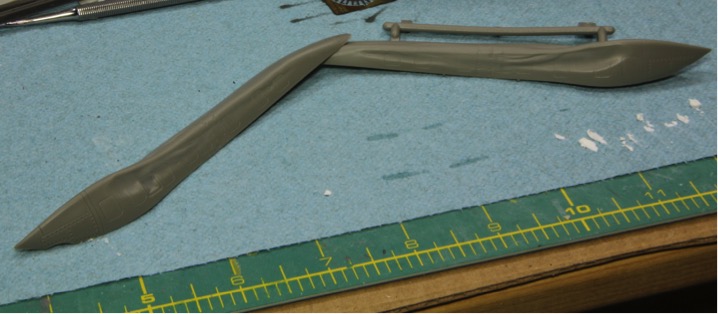
The next challenge was the conformal fuel tanks. My intent here was to take the set of conformals from my Kinetic F-16I, do a little bit of doctoring then cast a set in resin. First step was to fill in the hollowed out backs of the kit tanks. For this is used some Tamiya Putty I had laying around. Well this was a mistake. The ensuing chemical reaction turned the tanks into a melted mess.
I should have known better, its totally my fault. But on the bright side, I sent an email off to Kinetic models and asked if they would sell me a couple of sets of the tanks. They responded the next day and asked me to send $7 to cover shipping them to the states. They sent them to me effectively for free. I even explained how I had screwed them up. Honestly, can’t beat that. A lot of people knock on Kinetic but this is the second time they have saved a project for me, can’t beat good customer service!
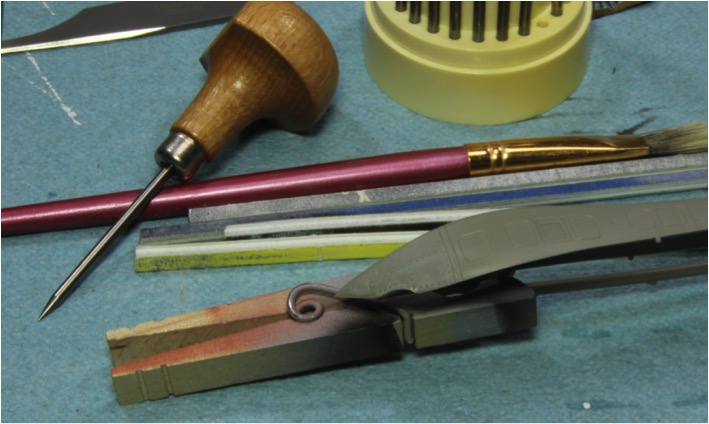
Once the arrived I cleaned up some of the larger rivets on the tanks.
I thought they were way to big but my references showed that in fact the fasteners on the front and the back are in fact larger then the others. The kinetic rivets however need some help. They are not round and in some cases at an angle to the surface. I filled them in and then added new rivets. Probably a little tough to see in the photo.
Next was the installation. The Kinetic tanks are pretty close to the contour of the Tamiya hull, but not exact. I had to spend some time sanding down the tanks until I got a good fit. There are two real problem areas, the rounded part at the front and a smaller area on top, once those are sorted out, the fit was really pretty good. Once they were attached I puttied the gaps. First one on was the right side. You can see where I had to add the putty.
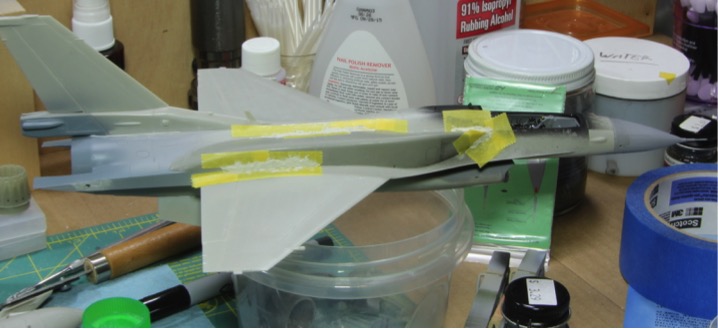
Then the left side tank was sanded and attached.
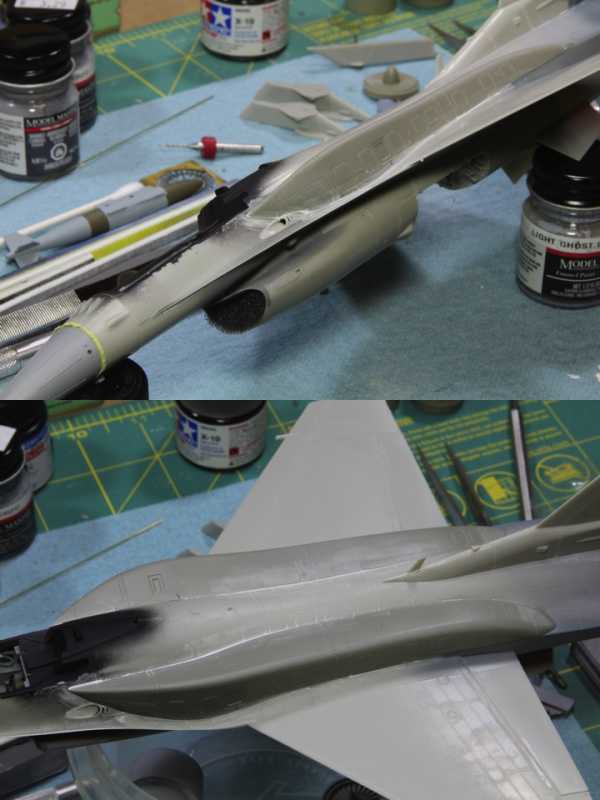
In the end the fit is not perfect, and I goofed a little on placement relative to each other but I definitely captured the look I was going for.
And here is where we are to day.
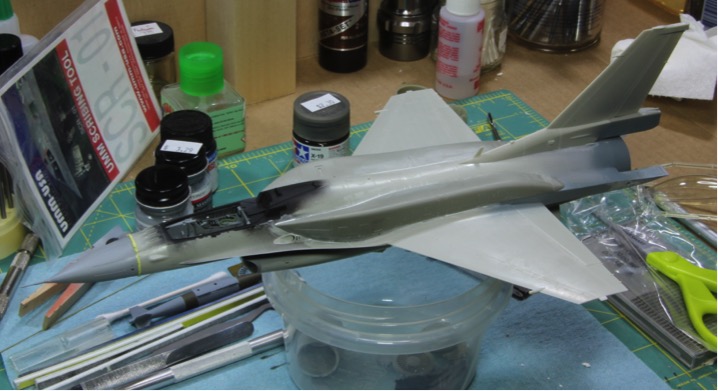
I have a few more bits and pieces to add to the fuselage and then I should have it in the paint barn some time this week. Then to get the detail parts finished up. Still a lot to do, but getting closer to the finish line.
Thanks for watching folks, I have a bit of momentum on this build right now, I hope to keep it up!
Mike
Here is the progress! This has been a fairly challenging build, and lately it really seems like it’s a few steps forward followed by a step backwards, especially with the aftermarket. I’m not going to spend a lot of time on the kit parts here, it’s a Tamiya F-16, the fit is good and everything goes where its supposed to with limited fuss. I have found myself referring back to the instructions from my Block 50 build, just to make sure that I have the right parts installed where they are supposed to go since this kit is technically for every block but a block 52! One modification I did however was to modify the part of the lower fuselage that goes over the MLG bay to allow me to add it later. One thing I dislike about the Tamiya F-16, really the only thing, is having to add the MLG before assembly is complete, just makes it hard to paint and there is the risk of damage. I saw this technique somewhere else and thought I would give it a try. So I modified the attachment ring so I can slide it all together at the end.
Lets talk about the aftermarket mods. First off the engine. My intent was to use the Eduard PW motor. Its actually not too bad looking. My resin had a few bubbles but nothing a little CA glue wouldn’t clean up.
Now here’s the issue, well issues really, first of all the casting is wrong. The portion that is supposed to attach to the fuselage and contains the end of the burner can (the part that the tail feathers attach to) is actually correct for the Block 50 GE motors not the PW motors. In Eduard’s defense, the kit part of the donut is actually also incorrect, its for the GE motors as well. Truthfully I could have lived with this, if that was the only issue. Generally I’m the only one looking at my models when they are on the shelf and no one else that might has any idea what I am even talking about. Which brings us to problem #2, the diameter of the ring, where it mates to the fuselage is also incorrect. It is two small and its not the same shape. Ugg. After spending some time thinking about the problem, I thought about trying out an Aires PW motor for the Tamiya kit, oddly enough the donut fight perfectly and its all the correct type for the PW motors. So much for the shrinking Aires resin! Here is a comparison of the three with the aires parts in the background.
Wolfpack is on the left with the Aires on the right and the kit part in the middle.
I installed the ring and cleaned up my crooked sanding lines. Sorry forgot to take a picture of that part installed. Once all that was cleaned up, I painted the underside of the tail and the top of the engine donut in MM FS35237 because it will be much harder to paint those when assembled. Then I installed the tail and puttied the few little gaps at the join.
Next up was the nose. I used a Royale resin nose, which is one piece. This allows you to keep the zipper on the top of the nose as opposed to the two piece nose in the kit. I added a metal pitot tube from Hobby Decal. I always break off the plastic pitot tubes, so I am going metal wherever I can. There were some gaps between the radome and the fuselage (I was a little heavy handed with the sanding sticks) which I am currently waiting on the milliput to dry before sanding it down.
The next challenge was the conformal fuel tanks. My intent here was to take the set of conformals from my Kinetic F-16I, do a little bit of doctoring then cast a set in resin. First step was to fill in the hollowed out backs of the kit tanks. For this is used some Tamiya Putty I had laying around. Well this was a mistake. The ensuing chemical reaction turned the tanks into a melted mess.
I should have known better, its totally my fault. But on the bright side, I sent an email off to Kinetic models and asked if they would sell me a couple of sets of the tanks. They responded the next day and asked me to send $7 to cover shipping them to the states. They sent them to me effectively for free. I even explained how I had screwed them up. Honestly, can’t beat that. A lot of people knock on Kinetic but this is the second time they have saved a project for me, can’t beat good customer service!
Once the arrived I cleaned up some of the larger rivets on the tanks.
I thought they were way to big but my references showed that in fact the fasteners on the front and the back are in fact larger then the others. The kinetic rivets however need some help. They are not round and in some cases at an angle to the surface. I filled them in and then added new rivets. Probably a little tough to see in the photo.
Next was the installation. The Kinetic tanks are pretty close to the contour of the Tamiya hull, but not exact. I had to spend some time sanding down the tanks until I got a good fit. There are two real problem areas, the rounded part at the front and a smaller area on top, once those are sorted out, the fit was really pretty good. Once they were attached I puttied the gaps. First one on was the right side. You can see where I had to add the putty.
Then the left side tank was sanded and attached.
In the end the fit is not perfect, and I goofed a little on placement relative to each other but I definitely captured the look I was going for.
And here is where we are to day.
I have a few more bits and pieces to add to the fuselage and then I should have it in the paint barn some time this week. Then to get the detail parts finished up. Still a lot to do, but getting closer to the finish line.
Thanks for watching folks, I have a bit of momentum on this build right now, I hope to keep it up!
Mike
Flyingbabydoc
Well-known member
Excellent Job Mike! 
I am looking Forward to the further developments, particularly in the L'ultima Diana. I have seen this aircraft once "live" in Italy and fell in love ever since...
Cheers and good luck
Alex
I am looking Forward to the further developments, particularly in the L'ultima Diana. I have seen this aircraft once "live" in Italy and fell in love ever since...
Cheers and good luck
Alex
Excellent construction Mike. So Eduard didn't fit, again?
centaur567
Well-known member
Great job on the tanks Mike!! I always though that they made the F-16 look a little more badass. Gary
Skinny_Mike
Well-known member
Great job,Mike
Luiz
Thanks Luiz, a good kit to start with really helps.
DANG :woohoo:
Tanks dave! :cheer:
Excellent Job Mike!
I am looking Forward to the further developments, particularly in the L'ultima Diana. I have seen this aircraft once "live" in Italy and fell in love ever since...
Cheers and good luck
Alex
Thanks Alex, I'm with you - I really want to get Diana done, that build has been started and stopped for a number of years, by is a much bigger mod to the base kit. I was trying to get the HAF viper done for a group build but I didn't get it done in time, so I am going to go back to my strategy of the side by side builds. Should be some good progress on Diana this weekend!
Excellent construction Mike. So Eduard didn't fit, again?
Thanks Bob - and yes the Brassin didn't fit again! :S I'm not helping your hate/hate relationship with Eduard here am I? :pp
Great job on the tanks Mike!! I always though that they made the F-16 look a little more badass. Gary
Totally with you Gary - the CFTs were defiantly a reason for doing this build. They do look super cool. Oddly enough I have found out that the Greeks can't carry the CFTs, wing tanks and ordnance at the same time. The airframe won't take it. The Israeli's do it on their F-16I, in fact they use CFTs ordnance and the 600 gal wing tanks. I guess they had their airframes reinforced, which would explain how that variant became the heaviest of the vipers.
That's modeling! Nice work Mike. Fine job getting those to fit up, they turned out really well. Looking forward to seeing these in some paint.
Thanks man. I definitely did a better job the second time around, but it was nothing some putty couldn't fix! Paint will be soon!
Hawkwrench
Active member
Those CFT's just make the F-16 more sleek and give it that "yeah, I'm fast, I'm cool and I will shoot you down now!" look. Kudos to Kinetic for the beans out of the fire save.
Looking forward to more progress!
Tim
Looking forward to more progress!
Tim
phantom II
Master at Arms
Hi guys, well I have a bit of an update here today, I was originally trying to get this finished for a group build on another site, but as with every other group build I enter, I never quite get done on time. I was hoping to take this to the local show this weekend too, but I’m just not going to get there. Truthfully, I would rather have a well-done model in the display case then a rushed build on a competition table anyway.

I much prefer one good one over several mediocre ones myself
I think your efforts to fare those tanks so well might be for unfounded .
Internet pictures seem to show some clearances to the fuselage.
It seems I read that the Israeli bought the F-16's with beefed up wings.
I sure wish the Air Force had bought F-16 XLs . Just seemed like a better idea for air to mud :idonno
Cheers, Christian B)
Skinny_Mike
Well-known member
Cool. Those go fast tanks look ugly and cool at the same time. Watching with interest.
JAmes
Yeah - the CFTs really make it just look a little bit meaner. Thanks for watching James!