• Modelers Alliance has updated the forum software on our website. We have migrated all post, content and user accounts but we could not migrate the passwords.
    This requires that you manually reset your password.
    Please click here, http://modelersalliance.org/forums/login to go to logon page and use the "Forgot your Password" option.

1/35 KARL GERAT 040

Brilliant, awesome, and perfecto...
perfecto.gif

:) Thanks Tanktrax. Sorry missed you on the first pass.

:) jezAU thanks mate.

MP - No Problem. Working on a bit of everything that is 'unfinished', and planning a panzer 4 painting, but overall accomplishing nothing at present. Haven't been able to get motivated properly since finishing the 17cm Grille.:hmmm
I think I burnt out a bit on that one.:blink
Hope I get my passion back, as it is a bit worrying at present - never been without the passion before.:unsure: Work is very busy and i don't get enough down time to relax enough to get creative. Much harder these days.

Ian.

Ian.
 
:cheer: :) Back again with some more build shots. Sorry about the last set of photos but I had a very poor digital at the time. I think you should enjoy the next lot a bit more.
THE TRACKTrumpeter provide a base for the track that sits at a nice height but the construction of the track over the long distance, intergrated with the base, makes it a bit 'dicey'.
I ended up supporting the shape by glueing strip plastic supports on the inside of the bevelled edge, accross every section join and this stabilised and strengthened it enough. I then had to putty up the drops in levels between each section on the outer side to 'fix - up appearances. I added this to a wooden base and then ordered a perspex top for the sucker as it was way to big for my cabinet.
I also added some ground work to the tracks as the moulded detail just needed something more. The track detail though is very good right down to the securing pins.
100_1854.jpg


Here you can see how the base fits together.I ended up adding a black 2.5mm perspex strip to each side to give it a better finish.The last photo shows the perspex cover I ended up having made.
IMG_3222.jpg

 
The kubelwagon
The Kubelwagon on this dio was a Tamiya one. A very nice, simple build that comes up well with paint. I built this OOTB.
I started with a basic caot of Tamiya German Grey.
IMG_1101.jpg


I added some light Maskol around the areas were the yellow overspay would wear. This vehicle is modeled as a high wear feild propaganda car that travels around the front filming for official sources.
IMG_1139.jpg


I then did the internal detail painting and lightly hand chipped and dry brushed the body.
The seats werepainted in a dark brown, I applied a dark Sienna wash over this then once dry I aplied some dust with pigments. I finished with Black Artists oil paint lightly dry brushed to bring the base seat color back through the dirt for a dirty well used effect. Oils work very well in this way when applied over the dry pigment texture with a darker color - perfect for wear and tear on any surface . I use this effect on my tanks (steel) surfaces as well.

IMG_1194.jpg


IMG_1197.jpg
IMG_1196.jpg
 
SOME MORE PEICES OF INTEREST:)

Well hello again,
I will add some more explanation here around the texture of the gun manlet
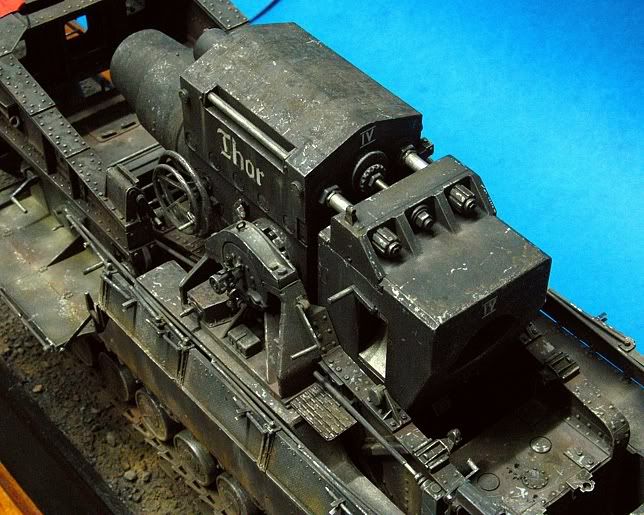
Gun block Texture

The gun block (which was removable for transport through tunnels on the train) was a very rough cast piece of metal and looks to me to have been cast in a sand mould because of its texture. I wanted to get this effect but both models had very smooth plastic surfacers so this is how i went about changing that.
You can see how roughly cast the real one was here......
texture.jpg


I gave the plastic some texture with some Testors liquid cement and a brush that I have cut down to a short stump for just this purpose.
IMG_3172.jpg


IMG_3171.jpg


After a couple of coats of this with stippling the plastic in between, I add some Mr Surfacer 500. I stipple this as well, with two coats, then gave it a light sanding to take off the high spots. I then used the 1000 for additional texture.

IMG_3173.jpg


I added 5 types of greys, moving up from dark to light, then scratches and chips, then pastel - dust and dirt and then some oils.

Family032.jpg


I wanted to get a multi layered effect with the colors as you ofetn see with dark metals. I used a stippling approach with various dark spots made from a mix of raw umber, burnt sienna and black stippled over the tamiya layered greys. The final touches were with stell, chrome, lead pencil and some light dust pigments. After the dust I went back over lightly adding some more stains with the oil mix.

Family008.jpg

IMG_5089smaller.jpg


Because the top comes off the opportunity to simulate an oiled up steel suface was irresistable as a viewing alternative for my display.

IMG_5165ps.jpg

IMG_2674.jpg

IMG_2684.jpg
 
Back
Top