Michael Bishop
New member
I want to start off by apologizing for not contributing any comments about any of the really creative work you have all been submitting. I really am happy to sponsor the build and just sit and watch the parade go by. None of you need my input anyway.
I assume the kits have all arrived to the far corners of the modeling world by now.
I have been able to take a couple of days off of work from my regular job and find some time to follow up on a few things I have been thinking about. I've been reading the nice comments about the kit and the material and I had intended to write a little bit about the Normandy Well kit and how it came to be.
The Normandy Well was one of the very first kits offered by MPD Studios when we first started over 9 years ago.
We did a fair bit of experimenting with materials, process, contractors and subject matter.
The kit is cast from a hybrid of resin and ceramic that makes it a little bit unique. The combining of the materials was a good compromise of keeping the kit affordable and sturdy. Not as brittle as a pure plaster cast kit and not as expensive as a pure resin cast kit. One advantage of using the material is that the well could be designed as an actual kit that required/allowed some assembly. Another advantage was the elimination of needing to prime and seal the kit for painting. The material allows for some freehanded washes and stains and the paint soaks into it slower than pure plaster as it seals it to some degree.
The disadvantage of the material was the distortion of some of the parts, either through the demolding process or the hand cleanup. Also the weight became an issue on our larger kits like the North African Street Scene.
We still have a good quantity of those early cast kits that can ship in a flat rate box for relatively cheap, whenever we figure out how to offer that option on the website...
Back to the assembly aspect of the well. We wanted it in multiple parts to allow for some customization in how it might be asembled. A one piece casting would not have allowed for that. We envisioned a lot of our early kits (and still try with our latest kits) as 3-D postcards of places in Europe that people may have visited, or have wanted to visit. We want all of our kits to be buildable by people who aren't necessarily hobbyists and who don't have a lot of specialized tools or paints.
For someone who hasn't built a model before, the well may be a little bit of a challenge and for someone with experience, the well might be the impetus for some more elaborate detailing. We didn't include the small details like the bucket supports or spouts but hope everyone will rise to the occasion and "source" them from things around the house, if not their "spares" box. Any seams and gaps between parts are an opportunity to experiment with filler putty, spackle, super glue, or whatever you have at hand.
Our goal with our kits is to provide some intellectual challenge with assembly and some level of satisfaction in problem solving and creative thinking.
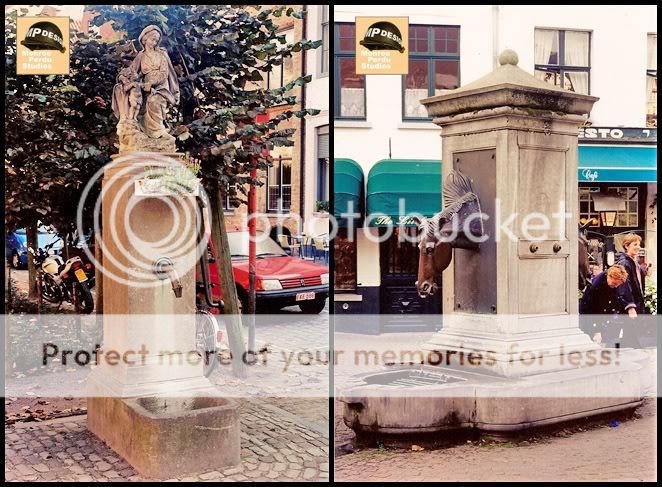
Everyone in this build has the right attitude and I'm excited to see how all of them come together. I wanted to show a few examples of how the kit might be modified to change the look and size in case people might be stuck for ideas. I've only cut and glued them so far. I'll do my best to paint them as soon as I can. I addded spouts and bucket supports from styrene rod and stick. I cut the parts with a very cheap bandsaw I have in my shop but the material can be cut with a razor saw without too much difficulty. Here are the results so far. I'm trying to add the image from Photobucket and I hope it works.

1. I cut a section out of the basin and brought it back towards the column. I cut the base pad smaller also.
2. I removed a section of the basin slab to lower the column. I also cut the pyramid top piece smaller.
3. I cut one section of blocks from the top of the column, cut the pyramid smaller, eliminated the stepped cornice and the base plate.
That's it for now. I hope I'm helping anyone with creative block a little bit.
Mike
I assume the kits have all arrived to the far corners of the modeling world by now.
I have been able to take a couple of days off of work from my regular job and find some time to follow up on a few things I have been thinking about. I've been reading the nice comments about the kit and the material and I had intended to write a little bit about the Normandy Well kit and how it came to be.
The Normandy Well was one of the very first kits offered by MPD Studios when we first started over 9 years ago.
We did a fair bit of experimenting with materials, process, contractors and subject matter.
The kit is cast from a hybrid of resin and ceramic that makes it a little bit unique. The combining of the materials was a good compromise of keeping the kit affordable and sturdy. Not as brittle as a pure plaster cast kit and not as expensive as a pure resin cast kit. One advantage of using the material is that the well could be designed as an actual kit that required/allowed some assembly. Another advantage was the elimination of needing to prime and seal the kit for painting. The material allows for some freehanded washes and stains and the paint soaks into it slower than pure plaster as it seals it to some degree.
The disadvantage of the material was the distortion of some of the parts, either through the demolding process or the hand cleanup. Also the weight became an issue on our larger kits like the North African Street Scene.
We still have a good quantity of those early cast kits that can ship in a flat rate box for relatively cheap, whenever we figure out how to offer that option on the website...
Back to the assembly aspect of the well. We wanted it in multiple parts to allow for some customization in how it might be asembled. A one piece casting would not have allowed for that. We envisioned a lot of our early kits (and still try with our latest kits) as 3-D postcards of places in Europe that people may have visited, or have wanted to visit. We want all of our kits to be buildable by people who aren't necessarily hobbyists and who don't have a lot of specialized tools or paints.
For someone who hasn't built a model before, the well may be a little bit of a challenge and for someone with experience, the well might be the impetus for some more elaborate detailing. We didn't include the small details like the bucket supports or spouts but hope everyone will rise to the occasion and "source" them from things around the house, if not their "spares" box. Any seams and gaps between parts are an opportunity to experiment with filler putty, spackle, super glue, or whatever you have at hand.
Our goal with our kits is to provide some intellectual challenge with assembly and some level of satisfaction in problem solving and creative thinking.
Everyone in this build has the right attitude and I'm excited to see how all of them come together. I wanted to show a few examples of how the kit might be modified to change the look and size in case people might be stuck for ideas. I've only cut and glued them so far. I'll do my best to paint them as soon as I can. I addded spouts and bucket supports from styrene rod and stick. I cut the parts with a very cheap bandsaw I have in my shop but the material can be cut with a razor saw without too much difficulty. Here are the results so far. I'm trying to add the image from Photobucket and I hope it works.
1. I cut a section out of the basin and brought it back towards the column. I cut the base pad smaller also.
2. I removed a section of the basin slab to lower the column. I also cut the pyramid top piece smaller.
3. I cut one section of blocks from the top of the column, cut the pyramid smaller, eliminated the stepped cornice and the base plate.
That's it for now. I hope I'm helping anyone with creative block a little bit.
Mike
 (sorry for the pun) ! It has helped me out anyway !